CheapASPNETHostingReview.com| Best and cheap ASP.NET Core 1.0 hosting. In this post we will talking about Authentication in ASP.NET for web API and Angular. Authentication in a single page application is a bit more special, if you just know the traditional ASP.NET way. To imagine that the app is a completely independent app like a mobile app helps. Token based authentication is the best solution for this kind of apps. In this post I’m going to try to describe a high level overview and to show a simple solution.
There are many ways to protect your application out there. The simplest one is using an Azure Active Directory. You could also setup a separate authentication server, using IdentityServer4, to manage the users, roles and to provide a token based authentication.
And that’s the key word: A Token Based Authentication is the solution for that case.
With the token bases authentication, the client (the web client, the mobile app, and so on) gets a string based encrypted token after a successful log-in. The token also contains some user info and an info about how long the token will be valid. This token needs to be stored on the client side and needs to be submitted to the server every time you request a resource. Usually you use a HTTP header to submit that token. If the token is not longer valid you need to perform a new log-in.
In one of our smaller projects, didn’t set-up a different authentication server and we didn’t use Azure AD, because we needed a fast and cheap solution. Cheap from the customers perspective.
The Angular2 part
On the client side we used angular2-jwt, which is a Angular2 module that handles authentication tokens. It checks the validity, reads meta information out of it and so on. It also provides a wrapper around the Angular2 HTTP service. With this wrapper you are able to automatically pass that token via a HTTP header back to the server on every single request.
The work flow is like this.
If the token is not valid or doesn’t exist on the client, the user gets redirected to the log-in route
The user enters his credentials and presses the log-in button
The date gets posted to the server where a special middle-ware handles that request
The user gets authenticated on the server side
The token, including a validation date and some meta date, gets created
The token gets returned back to the client
the client stores the token in the local storage, cookie or whatever, to use it on every new request.
The angular2-jwt does the most magic on the client for us. We just need to use it, to check the availability and the validity, every time we want to do a request to the server or every time we change the view.
This is a small example about how the HTTP wrapper is used in Angular2:
On the server side we also use a, separate open source project, called SimpleTokenProvider. This is really a pretty simple solution to authenticate the users, using his credentials and to create and provide the token. I would not recommend to use this way in a huge and critical solution, in that case you should choose the IdentiyServer or any other authentication like Azure AD to be more secure. The sources of that project need to be copied into your project and you possibly need to change some lines e. g. to authenticate the users against your database, or whatever you use to store the user data. This project provides a middle-ware, which is listening on a defined path, like /api/tokenauth/. This URL is called with a POST request by the log-in view of the client application.
The authentication for the web API, is just using the token, sent with the current request. This is simply done with the built-in IdentiyMiddleware. That means, if ASP.NET MVC gets a request to a Controller or an Action with an AuthorizeAttribute, it checks the request for incoming Tokens. If the Token is valid, the user is authenticated. If the user is also in the right role, he gets authorized.
We put the users role information as additional claims into the Token, so this information can be extracted out of that token and can be used in the application.
To find the users and to identify the user, we use the given UserManager and SignInManager. These managers are bound to the IdentityDataContext. This classes are already available, when you create a new project with Identiy in Visual Studio.
This way we can authenticate a user on the server side:
This code will not work, if you copy and past it in your application, but shows you what needs to be done to create a token and how the token is created and sent to the client.
CheapASPNETHostingReview.com | Best and cheap ASP.NET Core 1.0 hosting. Even though the ASP.NET Web platform and ASP.NET project scaffold have undergone some significant changes, ASP.NET MVC Views and Controllers have faced rather minor transformation in comparison with the shift in skeleton of the Application with the new platform. So here’s a brief outline of the latest news in ASP.NET development.
In this article, I’m going to describe the main concepts of building claim-based security on top of a brand-new platform: ASP.NET Core (with .NET Core). At the same time, I will create an application with similar functionality (as was done in my previous article), highlighting the differences.
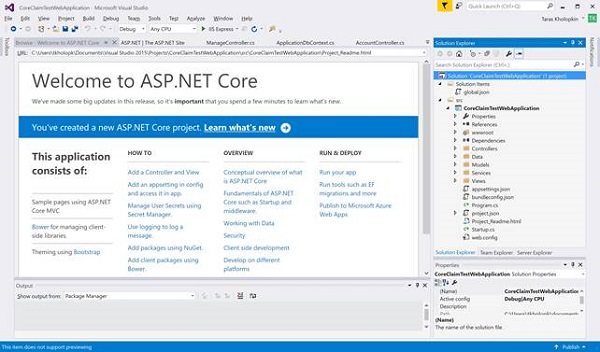
Let’s get down to work. Create a “Hello World” ASP.NET Core Web application using the .NET Core framework
Figure 1: Creating a new ASP.NET Core Web application
Just like in the previous version of ASP.NET MVC, the main job is done. The default Visual Studio .NET Web Project template has already added all the namespaces and assemblies required for our test project. The only thing left is to implement simple functionality to add a new Claim during the user registration/creational process and then apply the authorization restriction to the user with the Claim specified.
Let’s quickly review the most important pieces of functionality responsible for security work this time:
Startup.cs is a class for the entire application bootstrap, including security:
// Enable the application to use a cookie to store information
// for the signed-in user and to use a cookie to temporarily
// store information about a user logging in with a
// third-party login provider
app.UseIdentity();
// Add external authentication middleware below. To configure
// them, please see http://go.microsoft.com/fwlink/?LinkID=532715
app.UseMvc(routes=>
{
routes.MapRoute(
name:"default",
template:"{controller=Home}/
{action=Index}/{id?}");
});
}
}
Models\ApplicationUser.cs contains an ApplicationUser class that derives from Microsoft.AspNetCore.Identity.EntityFrameworkCore.IdentityUser:
1
2
3
4
5
// Add profile data for application users by
// adding properties to the ApplicationUser class
publicclassApplicationUser:IdentityUser
{
}
Until now, it’s been empty, so this is where we should add our claims. Let’s start applying code changes to demonstrate Claim-based security in real life:
1. Enable Entity Framework Migrations
Enable Entity Framework Migrations if there are any iterative changes to Claims planned. Because ASP.NET Identity uses Code First, auto-migration would be useful to perform database schema updates
2. Add Relevant Properties
Add all relevant properties to the ApplicationUser class (in file Models\ApplicationUser.cs) to store the Claims. Let’s take “BirthDate” and add this property to ApplicationUser. Don’t forget to add the using System clause before class definition.
3. Add EF Migration
Add EF migration to the update database with the new field. In the Package Manager Console, perform the following steps:
Add-Migration “Age” <press Enter> to create an upgrade script for our modification.
Update-Database <press Enter> to run a database schema update.
Now, we need to implement the filling out of the Birthday value. To make it more obvious, add a Birthday parameter to the User Registration form in the Models\AccountViewModels\RegisterViewModel.cs RegisterViewModel class:
1
2
3
4
5
6
7
8
9
10
11
12
13
14
15
16
17
18
19
20
21
22
23
24
25
26
27
publicclassRegisterViewModel
{
[Required]
[EmailAddress]
[Display(Name="Email")]
publicstringEmail{get;set;}
[Required]
[StringLength(100,ErrorMessage="The {0} must be
at least {2} and at max {1} characters long.",
MinimumLength=6)]
[DataType(DataType.Password)]
[Display(Name="Password")]
publicstringPassword{get;set;}
[DataType(DataType.Password)]
[Display(Name="Confirm password")]
[Compare("Password",ErrorMessage="The password
and confirmation password do not match.")]
publicstringConfirmPassword{get;set;}
[Required]
[Display(Name="Date of Birth")]
[DataType(DataType.Date)]
publicDateTimeBirthDate{get;set;}
}
4. Update the Views\Account\Register.cshtml File
Update the Views\Account\Register.cshtml file with the new field:
1
2
3
4
5
6
7
8
9
10
11
12
...
<div class="form-group">
<label asp-for="BirthDate"
class="col-md-2 control-label"></label>
<div class="col-md-10">
<input asp-for="BirthDate"
class="form-control"/>
<span asp-validation-for="BirthDate"
class="text-danger"></span>
</div>
</div>
...
5. Update the Controllers\AccountController.cs Register Method
Update the Controllers\AccountController.cs Register method to pass Birthday:
_logger.LogInformation(3,"User created a new account
with password.");
returnRedirectToLocal(returnUrl);
}
AddErrors(result);
}
// If we got this far, something failed, redisplay form
returnView(model);
6. Add the Claims
Now, we need to add the Claims. To be more precise, we need a mechanism to add the Claims in ASP.NET Core because Microsoft.AspNetCore.Identity.SignInManager<TUser>, by default, includes only username and user identifier claims. SignInManager<TUser> uses IUserClaimsPrincipalFactory<TUser> to generate ClaimsPrincipal from TUser (in our case, from ApplicationUser).
We need to create our own implementation of IUserClaimsPrincipalFactory<TUser> to add custom claims. To not generate the boilerplate code, simply derive it from the default UserClaimsPrincipalFactory<TUser> which is already implementing IUserClaimsPrincipalFactory<TUser>.
1
2
3
4
5
6
7
8
9
10
11
12
13
14
15
16
17
18
19
20
21
22
23
24
25
26
27
publicclassCustomClaimsPrincipalFactory:
UserClaimsPrincipalFactory<ApplicationUser,
IdentityRole>
{
publicCustomClaimsPrincipalFactory(
UserManager<ApplicationUser>userManager,
RoleManager<IdentityRole>roleManager,
IOptions<IdentityOptions>optionsAccessor):
base(userManager,roleManager,optionsAccessor)
{
}
publicasync override Task<ClaimsPrincipal>
CreateAsync(ApplicationUser user)
{
varprincipal=await base.CreateAsync(user);
// Add your claims here
((ClaimsIdentity)principal.Identity).
AddClaims(new[]{
newClaim(ClaimTypes.DateOfBirth,
user.BirthDate.ToString())
});
returnprincipal;
}
}
7. Register CustomClaimsPrincipalFactory
We need to register our CustomClaimsPrincipalFactory in Startup.cs after the Identity setup has been added:
1
2
3
4
5
6
7
8
9
10
11
12
13
14
15
16
17
18
19
20
21
22
23
24
// This method gets called by the runtime. Use this method
We have implemented the Claims setup. The only thing left is to verify the Claim. It is a common practice to write custom Authorize filters to verify the availability and particular value of the Claim pair, and then put that filter on the controllers’ actions.
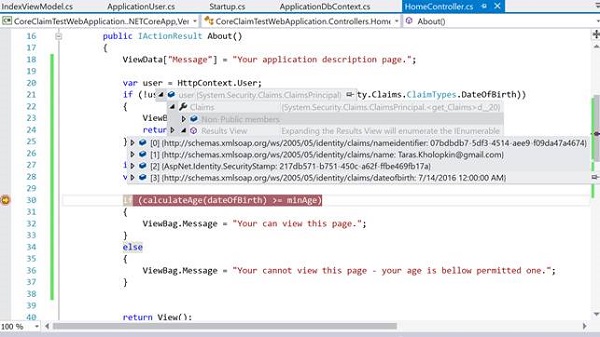
Claim BirthDay requires more checks, so I will implement verification of the Claim just for demonstration purposes in the Controllers\HomeController.cs About method:
Any Claim may be extracted easily from the HttpContext.User at any point of the project.
Traditionally, let’s try to verify if the code works.
Reviewing all the Claims (in debug window):
Figure 4: Viewing the Claims in the debug window
Conclusion
That was a step-by-step guideline to set up Claim-based security in ASP.NET Core with the help of ASP.NET Core Identity.
Compared to the previous-generation ASP.NET MVC, at first glance implementation of the Claim-based security looks more complicated in ASP.NET Core. Previously, it was possible to add the Claims directly in the ApplicationUser implementation via overriding the GenerateUserIdentityAsync() method. In ASP.NET Core, we need to implement IUserClaimsPrincipalFactory<TUser> that is internally used by SignInManager<TUser>. On the other hand, we’ve got more structured classes and interfaces implementation in ASP.NET Core, as logically SignInManager should indeed control sign-in processes (including claims) and ApplicationUser should be just an IdentityUser.
One more useful thing that was introduced in ASP.NET Core is Claim-Based Authorization on top of Policies. It simplifies the verification of Claims on Controllers and Methods, thereby providing an ability to group the Claims.
CheapASPNETHostingReview.com | Best and cheap ASP.NET Core 1.0 hosting. According to tutorialspoint website about the configuration related to ASP.NET Core project. In Solution Explorer, you will see the Startup.cs file. If you have worked with previous versions of ASP.NET Core, you will probably expect to see a global.asax file, which was one place where you could write codes to execute during startup of a web application.
You would also expect to see a web.config file containing all the configuration parameters your application needed to execute.
In ASP.NET Core those files are all gone, and instead of configuration and startup code are loaded from Startup.cs.
There is a Startup class inside the file and in this class you can configure your application and even configure your configuration sources.
Here is the default implementation in the Startup.cs file.
1
2
3
4
5
6
7
8
9
10
11
12
13
14
15
16
17
18
19
20
21
22
23
24
25
26
27
28
29
30
31
32
33
34
35
36
using System;
using System.Collections.Generic;
using System.Linq;
using System.Threading.Tasks;
using Microsoft.AspNetCore.Builder;
using Microsoft.AspNetCore.Hosting;
using Microsoft.AspNetCore.Http;
using Microsoft.Extensions.DependencyInjection;
using Microsoft.Extensions.Logging;
namespaceFirstAppDemo{
publicclassStartup{
// This method gets called by the runtime.
// Use this method to add services to the container.
// For more information on how to configure your application,
In the Startup class, there are two methods where most of our work will take place. The Configure method of the class is where you build your HTTP processing pipeline.
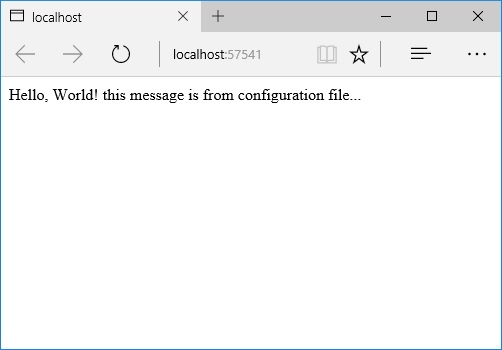
This defines how your application responds to requests. Currently this application can only say Hello World! and if we want the application to behave differently, we will need to change the pipeline around by adding additional code in this Configure method.
For example, if we want to serve the static files such as an index.html file, we will need to add some code to the Configure method.
You can also have an error page or route requests to an ASP.NET MVC controller; both of these scenarios will also require to do some work in this Configure method.
In the Startup class, you will also see the ConfigureServices() method. This helps you configure components for your application.
Right now, we have a hard-coded string for every response — the Hello World! string. Instead of hard-coding the string, we want to load this string from some component that knows the text that we want to display.
This other component might load that text from a database or a web service or a JSON file, it doesn’t matter where exactly it is.
We will just set up a scenario so that we do not have this hard-coded string.
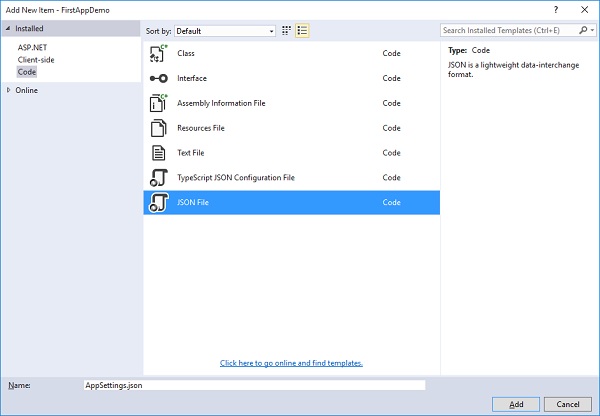
In the Solution Explorer, right-click on your project node and select Add → New Item
In the left pane, select Installed → Code and then in the middle pane, select the JSON File. Call this file AppSettings.json and click on the Add button as in the above screenshot.
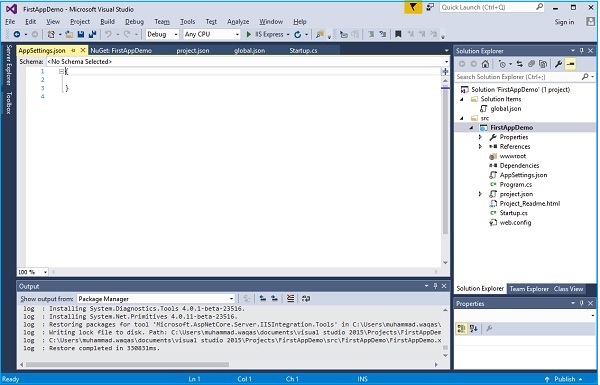
We can also have our program read the text from the file instead of having the Hello World! String in Startup.cs. Let us add the following code in AppSettings.json file.
1
2
3
{
"message":"Hello, World! this message is from configuration file..."
}
Now we need to access this message from the Startup.cs file. Here is the implementation of the Startup.cs file which will read the above message from the JSON file.
1
2
3
4
5
6
7
8
9
10
11
12
13
14
15
16
17
18
19
20
21
22
23
24
25
26
27
28
29
30
31
32
33
34
35
36
37
using Microsoft.AspNet.Builder;
using Microsoft.AspNet.Hosting;
using Microsoft.AspNet.Http;
using Microsoft.Extensions.DependencyInjection;
using Microsoft.Extensions.Configuration;
namespaceFirstAppDemo{
publicclassStartup{
publicStartup(){
varbuilder=newConfigurationBuilder()
.AddJsonFile("AppSettings.json");
Configuration=builder.Build();
}
publicIConfigurationConfiguration{get;set;}
// This method gets called by the runtime.
// Use this method to add services to the container.
// For more information on how to configure your application,
CheapASPNETHostingReview.com | Best and cheap ASP.NET MVC hosting. Securing your ASP.NET MVC application ought to be priority number a single each time you begin a brand new net application. Employing the attributes Authorize and ValidateAntiForgeryToken in every single controller and action will be the only method to stay away from any safety holes. In this post I’ll show you the best way to secure your ASP.NET application by implementing the AuthorizeAttribute and ValidateAntiForgeryTokenAttribute classes.
The basics
In the extremely least, you need to add an [Authorize] attribute to every controller or controller Action in case you would like several of the controller actions to be accessible by anonymous users. As an example, you probably want ALL users to possess access for the login and register actions of one’s web application.
By decorating the HomeController using the Authorize attribute (notice I didn’t specify any user part) the application will avert any unauthenticated user from executing any in the actions in this controller.
1
2
3
4
5
[Authorize]
publicclassHomeController:Controller
{
//...
}
The following is an instance of decorating a controller action with all the Authorize attribute, you desire to complete this if you only want to restrict access to a few of the actions in a controller instead of all actions.
1
2
3
4
5
[Authorize]
publicActionResult Create()
{
//...
}
Safeguarding against Cross-site request forgery attack (CSRF or XSRF)
The Authorize attribute delivers protection which is sufficient in most situations. Nonetheless, there’s security hole with this and therefore it opens your web application for a cross-site request forgery attack. By way of example, right after a user logs into your website the website will concern your browser an authentication token inside a cookie. Every single subsequent request, the browser sends the cookie back for the site to let the web site realize that you are authorized to take what ever action you are taking, so far every thing is very good.
Right here would be the issue with only using the Authorize attribute, let’s say that a user is logged in to your website and then they visit a spam web site by clicking on a hyperlink that points to one more web site which causes a kind post back to your site… this can be negative, your browser will send the authentication cookie to your website generating it seem as when the request came out of your website and initiated by an authenticated user when it genuinely didn’t.
The above situation is known as cross-site request forgery and can be avoided by adding the ValidateAntiForgeryToken attribute offered inside the .NET framework, this attribute is employed to detect regardless of whether a server request has been tampered with.
The initial step would be to add the ValidateAntiForgeryToken attribute to every single Post Action as follows:
1
2
3
4
5
[HttpPost,Authorize,ValidateAntiForgeryToken]
publicActionResult Create()
{
//...
}
The next step is to add the HtmlHelper strategy @Html.AntiForgeryToken() inside the type within your view.
The way the ValidateAntiForgeryToken attribute operates is by checking to view that the cookie and hidden kind field left by the Html.AntiForgeryToken() HtmlHelper essentially exists and match. If they do not exist or match, it throws an HttpAntiForgeryException shown beneath:
“A essential anti-forgery token was not supplied or was invalid”
By adding the ValidateAntiForgeryToken for your controller actions your internet site will likely be prepared to stop CSRF/XSRF attacks.
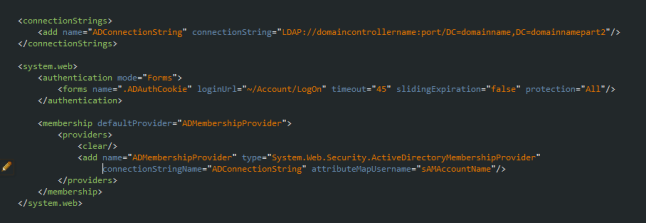
Implementing Forms Authentication using Active Directory (AD)
Often times you might run across a project where you need to authenticate users of your website using Active Directory credentials, the good news is that you can use the existing “Account” controller to achieve this, only a few modifications are necessary.
When you create a new MVC Web Application project and choose the Internet Application template, the Account controller is added to the project, you can use this controller with AD to authenticate your users. For the Account controller to work with AD we need to remove all Actions but the following:
Logon()
Logon(LogOnModel model, string returnUrl)
LogOff()
Your Account controller should look like the following after you remove the unnecessary Actions such as ChangePassword, Register, etc.
CheapASPNETHostingReview.com | Best and cheap ASP.NET core 1.0 hosting. If you’re new to ASP.NET Core or MVC Core, you’ll find that sessions don’t work the way they used to. Here’s how to get up and running the new way.
Add Session NuGet Package
Add the Microsoft.AspNetCore.Session NuGet package to your project.
VERSION WARNING: As you’ll find with most Microsoft.* packages, you should make sure the versions all match. At RTM time as of writing, this means “1.0.0”.
Update startup.cs
Now that we have the Session nuget package installed, we can add sessions to the ASP.NET Core pipeline.
Open up startup.cs and add the AddSession() and AddDistributedMemoryCache() lines to the ConfigureServices(IServiceCollection services)
1
2
3
4
// Add MVC services to the services container.
services.AddMvc();
services.AddDistributedMemoryCache();// Adds a default in-memory implementation of IDistributedCache
services.AddSession();
Next, we’ll tell ASP.NET Core to use a Memory Cache to store the session data. Add the UseSession() call below to the Configure(IApplicationBulider app, ...)
1
2
3
4
5
6
7
8
9
10
// IMPORTANT: This session call MUST go before UseMvc()
Relax it’s still there, just not where you think it is. You can now find the session object by using HttpContext.Session. HttpContext is just the current HttpContext exposed to you by the Controller class.
If you’re not in a controller, you can still access the HttpContext by injecting IHttpContextAccessor.
Let’s go ahead and add sessions to our Home Controller:
1
2
3
4
5
6
7
8
9
10
11
12
13
14
15
16
17
using Microsoft.AspNetCore.Http;// Needed for the SetString and GetString extension methods
You’ll see the Index() and About() methods making use of the Session object. It’s pretty easy here, just use one of the Set() methods to store your data and one of the Get() methods to retrieve it.
Just for fun, let’s inject the context into a random class:
Firstly I’m setting up a private variable to hold the HttpContextAccessor. This is the way you get the HttpContext now.
Next I’m adding a convenience variable as a shortcut directly to the session. Notice the =>? That means we’re using an expression body, aka a shortcut to writing a one liner method that returns something.
Moving to the contructor you can see that I’m injecting the IHttpContextAccessor and assigning it to my private variable. If you’re not sure about this whole dependency injection thing, don’t worry, it’s not hard to get the hang of (especially constructor injection like I’m using here) and it will improve your code by forcing you to write it in a modular way.
But wait a minute, how do I store a complex object?
How do I store a complex object?
I’ve got you covered here too. Here’s a quick JSON storage extension to let you store complex objects nice and simple
CheapASPNETHostingReview.com | Best and cheap ASP.NET Core 1.0 hosting. This article shows how localized data can be created and used in a running ASP.NET Core application without restarting. The Localization.SqlLocalizer package is used to to get and localize the data, and also to save the resources to a database. Any database which is supported by Entity Framework Core can be used.
Configuring the localization
The Localization.SqlLocalizer package is configured in the Startup class in the ConfigureServices method. In this example, a SQLite database is used to store and retrieve the data. The LocalizationModelContext DbContext needs to be configured for the SQL Localization. The LocalizationModelContext class is defined inside the Localization.SqlLocalizer package.
The AddSqlLocalization extension method is used to define the services and initial the SQL localization when required. The UseTypeFullNames options is set to true, so that the Full Type names are used to retrieve the localized data. The different supported cultures are also defined as required.
The database also needs to be created. This can be done using Entity Framework Core migrations.
1
2
3
4
5
>
>dotnet ef migrations add LocalizationMigrations--context LocalizationModelContext
>
>dotnet ef database update--context LocalizationModelContext
>
Now the SQL Localization is ready to use.
Saving the localized data
The application creates products with localized data using the ShopAdmin API. A test method AddTestData is used to add dummy data to the database and call the provider logic. This will later be replaced by an Angular 2 form component in the third part of this series.
The ProductCudProvider uses the LocalizationModelContext, and the ProductCudProvider class to save the data to the database. The class creates the entities from the View model DTO and adds them to the database. Once saved the IStringExtendedLocalizerFactory interface method ResetCache is used to reset the cache of the localized data. The cache could also be reset for each Type if required.
1
2
3
4
5
6
7
8
9
10
11
12
13
14
15
16
17
18
19
20
21
22
23
24
25
26
27
28
29
30
31
32
33
34
35
36
37
38
39
40
41
42
43
44
45
46
47
48
49
50
51
52
using Angular2LocalizationAspNetCore.Models;
using Angular2LocalizationAspNetCore.Resources;
using Angular2LocalizationAspNetCore.ViewModels;
using Localization.SqlLocalizer.DbStringLocalizer;
The Shop API is used to request the product data with the localized fields. The GetAvailableProducts method returns all products localized in the current culture.
The ProductRequestProvider is used to get the data from the database. Each product description and name are localized. The Localization data is retrieved from the database for the first request, and then read from the cache, unless the localization data was updated. The IStringLocalizer is used to localize the data.
1
2
3
4
5
6
7
8
9
10
11
12
13
14
15
16
17
18
19
20
21
22
23
24
25
26
27
28
29
30
31
32
33
34
35
36
37
38
39
40
41
42
43
44
45
46
using System;
using System.Collections.Generic;
using System.Linq;
using Angular2LocalizationAspNetCore.Models;
using Angular2LocalizationAspNetCore.Resources;
using Angular2LocalizationAspNetCore.ViewModels;
using Localization.SqlLocalizer.DbStringLocalizer;
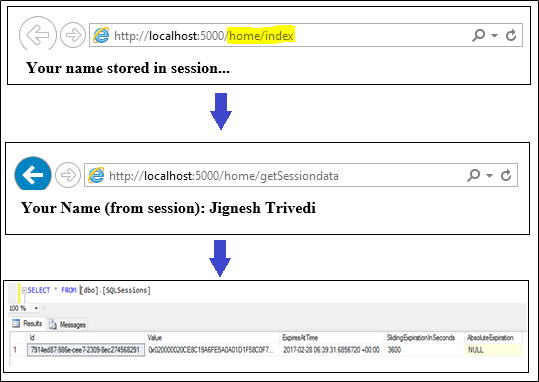
CheapASPNETHostingReview.com | Best and cheap ASP.NET Core hosting. Session is a feature in ASP.NET Core that enables us to save/store user data. Session stores the data in a dictionary on the Server and SessionId is used as a key. The SessionId is stored on the client at the cookie. The SessionId cookie is sent with every request. The SessionId cookie is Browser specific and it cannot be shared among the Browsers. There is no timeout specified for SessionId cookie and they are deleted when the Browser session ends.
Session are of two types: InProc or In-memory and OutProc or Distributed session. If our session is in-memory and our Application is hosted on Web-Farm environment, we need to use sticky sessions to tie each session to a specific server. Whereas OutProc session does not require sticky sessions and they are the most preferred way to use session in our application.
Configure SQL Server session state
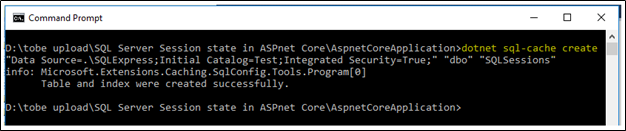
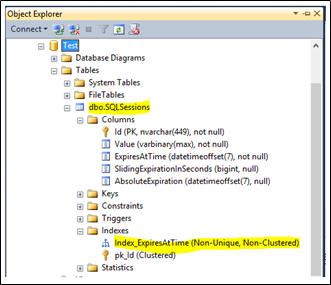
In SQL Server Session state, previous version of ASP.NET requires a number of tables and stored procedures to manage the storage of session in SQL server and this can be configured, using “aspnet_regsql” command or a tool. ASP.NET Core requires only one table. There are multiple ways to generate this storage table. The first is to use “Microsoft.Extensions.Caching.SqlConfig.Tools” tool. Before we run the commands of these tools, we need to install this tool. To install this tool, we need to add this tool in project.json and perform “dotnet restore” command.
Once this tool is installed for our project, we can execute “sql-cache” command, which generates the required table and an index. The command is in the format given below.
SQL session state internally uses memory cache, so as to enable SQL Server session. We need to add “Microsoft.Extensions.Caching.SqlServer” dependency along with “Microsoft.AspNet.Session” into project.json file.
We can add a connection string to appSetting.json file or put it directly in ConfigureServices method of startup class. Following is the definition of ConfigureServices and Configure method of startup class.
With SQL server state in ASP.NET Core, we can also create and use the session extension methods and we can also store complex objects in to the session.
Summary
This article described the steps required to enable SQL Server as a storage mechanism for session state in an ASP.NET Core MVC Application. The usage of SQL server session state is slightly different than the classic ASP.NET Application.
CheapASPNETHostingReview.com | Best and cheap ASP.NET hosting. “Creating a mathematical expression evaluator is one of the most interesting exercises in computer science, whatever the language used. This is the first step towards really understanding what sort of magic is hidden behind compilers and interpreters….“.
I agree completely, and hope that you do too.
Using the CalcEngine class
The CalcEngine class performs two main tasks:
Parses strings that contain formulas into Expression objects that can be evaluated.
Evaluates Expression objects and returns the value they represent.
To evaluate a string that represents a formula, you call the CalcEngine.Parse method to get an Expression, then call the Expression.Evaluate method to get the value. For example:
1
2
3
varce=newCalcEngine();
varx=ce.Parse("1+1");
varvalue=(double)x.Evaluate();
Alternatively, you can call the CalcEngine.Evaluate method directly. This parses the string into an expression, evaluates the expression, and returns the result. For example:
1
2
varce=newCalcEngine();
varvalue=(double)ce.Evaluate("1+1");
The advantage of the first method is that it allows you to store the parsed expressions and re-evaluate them without re-parsing the same string several times. However, the second method is more convenient, and because the CalcEngine has a built-in expression cache, the parsing overhead is very small.
Functions
The CalcEngine class implements 69 functions, selected from Excel’s over 300. More functions can be added easily using the RegisterFunction method.
RegisterFunction takes a function name, the number of parameters (minimum and maximum), and a delegate that is responsible for evaluating the function. For example, the “atan” function is implemented as follows:
1
2
3
4
5
6
7
varce=newCalcEngine();
ce.RegisterFunction("ATAN2",2,Atan2);
staticobjectAtan2(List<Expression>p)
{
returnMath.Atan2((double)p[0],(double)p[1]);
}
Function names are case-insensitive (as in Excel), and the parameters are themselves expressions. This allows the engine to calculate expressions such as “=ATAN(2+2, 4+4*SIN(4))”.
The CalcEngine class also provides a Functions property that returns a dictionary containing all the functions currently defined. This can be useful if you ever need to enumerate remove functions from the engine.
Notice how the method implementation listed above casts the expression parameters to the expected type (double). This works because the Expression class implements implicit converters to several types (string, double, bool, and DateTime). I find that the implicit converters allow me to write code that is concise and clear.
If you don’t like implicit converters, the alternative would be to override ToString in the Expression class and add ToDouble, ToDateTime, ToBoolean, etc.
Variables: Binding to simple values
Most calculation engines provide a way for you to define variables which can be used in expressions. The CalcEngine class implements a Variables dictionary that associates keys (variable names) and values (variable contents).
For example, the code below defines a variable named angle and calculates a short sine table:
1
2
3
4
5
6
7
8
9
10
11
12
13
14
15
16
17
18
19
20
21
// create the CalcEngine
varce=newCalcEngine.CalcEngine();
// calculate sin from 0 to 90 degrees
for(intangle=0;angle<=90;angle+=30)
{
// update value of "angle" variable
ce.Variables["angle"]=angle;
// calculate sine
varsin=ce.Evaluate("sin(angle * pi() / 180)");
// write it out
Console.WriteLine("sin({0}) = {1}",angle,sin);
}
// output:
sin(0)=0
sin(30)=0.5
sin(60)=0.866025403784439
sin(90)=1
Variables: Binding to CLR objects
In addition to simple values, the CalcEngine class implements a DataContext property that allows callers to connect a regular .NET object to the engine’s evaluation context. The engine uses Reflection to access the properties of the object so they can be used in expressions.
This approach is similar to the binding mechanism used in WPF and Silverlight, and is substantially more powerful than the simple value approach described in the previous section. However, it is also slower than using simple values as variables.
For example, if you wanted to perform calculations on an object of type Customer, you could do it like this:
1
2
3
4
5
6
// Customer class used as a DataContext
publicclassCustomer
{
publicstringName{get;set;}
publicdoubleSalary{get;set;}
publicList
CalcEngine supports binding to sub-properties and collections. The object assigned to the DataContext property can represent complex business objects and entire data models.
This approach makes it easier to integrate the calculation engine into the application, because the variables it uses are just plain old CLR objects. You don’t have to learn anything new in order to apply validation, notifications, serialization, etc.
Variables: Binding to dynamic objects
The original usage scenario for the calculation engine was an Excel-like application, so it had to be able to support cell range objects such as “A1” or “A1:B10”. This requires a different approach, since the cell ranges have to be parsed dynamically (it would not be practical to define a DataContext object with properties A1, A2, A3, etc).
To support this scenario, the CalcEngine implements a virtual method called GetExternalObject. Derived classes can override this method to parse identifiers and dynamically build objects that can be evaluated.
If the object returned implements the CalcEngine.IValueObject interface, the engine evaluates it by calling the IValueObject.GetValue method. Otherwise, the object itself is used as the value.
If the object returned implements the IEnumerable interface, then functions that take multiple values (such as Sum, Count, or Average) use the IEnumerable implementation to get all the values represented by the object.
For example, the sample application included with this article defines a DataGridCalcEngine class that derives from CalcEngine and overrides GetExternalObject to support Excel-style ranges. This is described in detail in a later section (“Adding Formula Support to the DataGridView Control”).
Optimizations
I mentioned earlier that the CalcEngine class performs two main functions: parsing and evaluating.
If you look at the CalcEngine code, you will notice that the parsing methods are written for speed, sometimes even at the expense of clarity. The GetToken method is especially critical, and has been through several rounds of profiling and tweaking.
For example, GetToken detects characters and digits using logical statements instead of the convenient char.IsAlpha or char.IsDigit methods. This does make a difference that shows up clearly in the benchmarks.
In addition to this, CalcEngine implements two other optimization techniques:
Expression caching
The parsing process typically consumes more time than the actual evaluation, so it makes sense to keep track of parsed expressions and avoid parsing them again, especially if the same expressions are likely to be used over and over again (as in spreadsheet cells or report fields, for example).
The CalcEngine class implements an expression cache that handles this automatically. The CalcEngine.Evaluate method looks up the expression in the cache before trying to parse it. The cache is based on WeakReference objects, so unused expressions eventually get removed from the cache by the .NET garbage collector. (This technique is also used in the NCalc library.)
Expression caching can be turned off by setting the CalcEngine.CacheExpressions property to false.
Expression optimization
After a string has been parsed, the resulting expression can sometimes be optimized by replacing parts of the expression that refer only to constant values. For example, consider the expression:
1
{4*(4*ATAN(1/5.0)-ATAN(1/239.0))+A+B}
This expression contains several constants and functions of constants. It can be simplified to:
1
{3.141592654+A+B}
This second expression is equivalent to the first, but can be evaluated much faster.
Expression simplification was surprisingly easy to implement. It consists of a virtual Expression.Optimize method that is called immediately after an expression is parsed.
The base Expression class provides an Optimize method that does nothing:
1
2
3
4
5
6
7
classBinaryExpression:Expression
{
publicvirtual Expression Optimize()
{
returnthis;
}
...
This simply allows all derived classes that derive from Expression to implement their own optimization strategy.
For example, the BinaryExpression class implements the Optimize method as follows:
1
2
3
4
5
6
7
8
9
10
11
12
classBinaryExpression:Expression
{
publicoverride Expression Optimize()
{
_lft=_lft.Optimize();
_rgt=_rgt.Optimize();
return_lft._token.Type==TKTYPE.LITERAL&&
_rgt._token.Type==TKTYPE.LITERAL
?newExpression(this.Evaluate())
:this;
}
..
The method calls the Optimize method on each of the two operand expressions. If the resulting optimized expressions are both literal values, then the method calculates the result (which is a constant) and returns a literal expression that represents the result.
To illustrate further, function call expressions are optimized as follows:
1
2
3
4
5
6
7
8
9
10
11
12
13
14
15
16
17
18
19
20
21
22
classFunctionExpression:Expression
{
publicoverride Expression Optimize()
{
boolallLits=true;
if(_parms!=null)
{
for(inti=0;i<_parms.Count;i++)
{
varp=_parms[i].Optimize();
_parms[i]=p;
if(p._token.Type!=TKTYPE.LITERAL)
{
allLits=false;
}
}
}
returnallLits
?newExpression(this.Evaluate())
:this;
}
...
First, all parameters are optimized. Next, if all optimized parameters are literals, the function call itself is replaced with a literal expression that represents the result.
Expression optimization reduces evaluation time at the expense of a slight increase in parse time. It can be turned off by setting the CalcEngine.OptimizeExpressions property to false.
Globalization
The CalcEngine class has a CultureInfo property that allows you to define how the engine should parse numbers and dates in expressions.
By default, the CalcEngine.CultureInfo property is set to CultureInfo.CurrentCulture, which causes it to use the settings selected by the user for parsing numbers and dates. In English systems, numbers and dates look like “123.456” and “12/31/2011”. In German or Spanish systems, numbers and dates look like “123,456” and “31/12/2011”. This is the behavior used by Microsoft Excel.
If you prefer to use expressions that look the same on all systems, you can set the CalcEngine.CultureInfo property to CultureInfo.InvariantCulture for example, or to whatever your favorite culture happens to be.
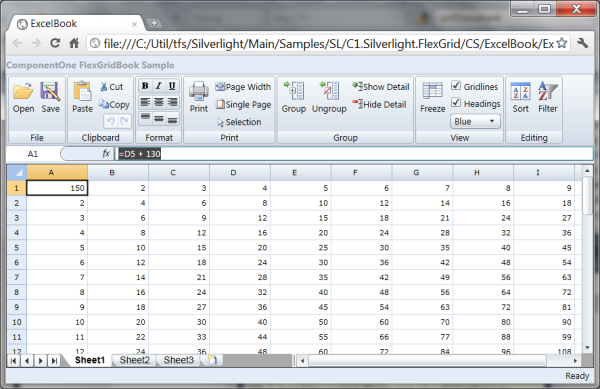
Sample: A DataGridView control with formula support
The sample included with this article shows how the CalcEngine class can be used to extend the standard Microsoft DataGridView control to support Excel-style formulas. The image at the start of the article shows the sample in action.
Note that the formula support described here is restricted to typing formulas into cells and evaluating them. The sample does not implement Excel’s more advanced features like automatic reference adjustment for clipboard operations, selection-style formula editing, reference coloring, and so on.
The DataGridCalcEngine class
The sample defines a DataGridCalcEngine class that extends CalcEngine with a reference to the grid that owns the engine. The grid is responsible for storing the cell values which are used in the calculations.
The DataGridCalcEngine class adds cell range support by overriding the CalcEngine.GetExternalObject method as follows:
1
2
3
4
5
6
7
8
9
10
11
12
13
14
15
16
17
18
19
20
21
22
23
24
25
26
27
28
29
30
/// &lt;summary>
/// Parses references to cell ranges.
/// &lt;/summary>
/// &lt;param name="identifier">String representing a cell range
/// (e.g. "A1" or "A1:B12".&lt;/param>
/// &lt;returns>A &lt;see cref="CellRange"/> object that represents
The method analyzes the identifier passed in as a parameter. If the identifier can be parsed as a cell reference (e.g., “A1” or “AZ123:XC23”), then the method builds and returns a CellRangeReference object. If the identifier cannot be parsed as an expression, the method returns null.
The CellRangeReference class is implemented as follows:
The CellRangeReference class implements the IValueObject interface to return the value in the first cell in the range. It does this by calling the owner grid’s Evaluate method.
The CellRangeReference also implements the IEnumerable interface to return the value of all cells in the range. This allows the calculation engine to evaluate expressions such as “Sum(A1:B10)”.
Notice that the GetValue method listed above uses an _evaluating flag to keep track of ranges that are currently being evaluated. This allows the class to detect circular references, where cells contain formulas that reference the cell itself or other cells that depend on the original cell.
The DataGridCalc class
The sample also implements a DataGridCalc class that derives from DataGridView and adds a DataGridCalcEngine member.
To display formula results, the DataGridCalc class overrides the OnCellFormatting method as follows:
The method starts by retrieving the value stored in the cell. If the cell is not in edit mode, and the value is a string that starts with an equals sign, the method uses CalcEngine to evaluate the formula and assigns the result to the cell.
If the cell is in edit mode, then the editor displays the formula rather than the value. This allows users to edit the formulas by typing into in the cells, just like they do in Excel.
If the expression evaluation causes any errors, the error message is displayed in the cell.
At this point, the grid will evaluate expressions and show their results. But it does not track dependencies, so if you type a new value into cell “A1” for example, any formulas that use the value in “A1” will not be updated.
To address this, the DataGridCalc class overrides the OnCellEditEnded method to invalidate the control. This causes all visible cells to be repainted and automatically recalculated after any edits.
Let’s not forget that implementation of the Evaluate method used by the CellRangeReference class listed earlier. The method starts by retrieving the cell content. If the content is a string that starts with an equals sign, the method evaluates it and returns the result; otherwise it returns the content itself:
That is all there is to the DataGridCalc class. Notice that calculated values are never stored anywhere . All formulas are parsed and evaluated on demand.
The sample application creates a DataTable with 50 columns and 50 rows, and binds that table to the grid. The table stores the values and formulas typed by users.
The sample also implements an Excel-style formula bar across the top of the form that shows the current cell address, content, and has a context menu that shows the functions available and their parameters.
Finally, the sample has a status bar along the bottom that shows summary statistics for the current selection (Sum, Count, and Average, as in Excel 2010). The summary statistics are calculated using the grid’s CalcEngine as well.
Testing
I built some testing methods right into the CalcEngine class. In debug builds, these are called by the class constructor:
1
2
3
4
5
6
7
8
9
10
publicCalcEngine()
{
_tkTbl=GetSymbolTable();
_fnTbl=GetFunctionTable();
_cache=newExpressionCache(this);
_optimize=true;
#if DEBUG
this.Test();
#endif
}
This ensures that tests are performed whenever the class is used (in debug mode), and that derived classes do not break any core functionality when they override the base class methods.
The Test method is implemented in a Tester.cs file that extends the CalcEngine using partial classes. All test methods are enclosed in an #if DEBUG/#endif block, so they are not included in release builds.
This mechanism worked well during development. It helped detect many subtle bugs that might have gone unnoticed if I had forgotten to run my unit tests when working on separate projects.
Benchmarks
While implementing the CalcEngine class, I used benchmarks to compare its size and performance with alternate libraries and make sure CalcEngine was doing a good job. A lot of the optimizations that went into the CalcEngine class came from these benchmarks.
I compared CalcEngine with two other similar libraries which seem to be among the best available. Both of these started as CodeProject articles and later moved to CodePlex:
NCalc: This is a really nice library, small, efficient, and feature-rich. I could not use NCalc in my Silverlight project because it relies on the ANTLR runtime DLL, which cannot be used in Silverlight projects (at least I couldn’t figure out how to do it).
Flee: Unlike CalcEngine and NCalc, Flee keeps track of formulas, their values, and dependencies. When a formula changes, Flee re-evaluates all cells that depend on it. One of the interesting features of Flee is that it actually compiles formulas into IL. This represents a trade-off since compilation is quite slow, but evaluation is extremely fast. I decided not to use Flee in my Silverlight project because it is relatively large and the parsing times were too long for the type of application I had in mind.
The benchmarking method was similar to the one described by Gary Beene in his 2007 Equation Parsers article. Each engine was tested for parsing and evaluating performance using three expressions. The total time spent was used to calculate a “Meps” (million expressions parsed or evaluated per second) index that represents the engine speed.
The expressions used were the following:
1
2
3
4*(4*Atan(1/5.0)-Atan(1/239.0))+a+b
Abs(Sin(Sqrt(a*a+b*b))*255)
Abs(Sin(Sqrt(a^2+b^2))*255)
Where “a” and “b” are variables set to 2 and 4.
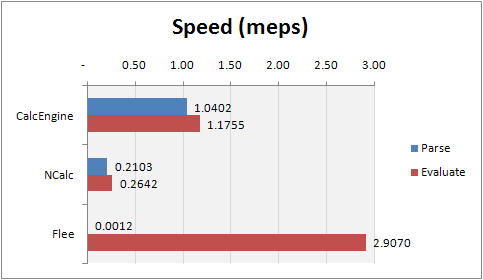
Each engine parsed and evaluated the expressions 500,000 times. The times were added and used to calculate the “Meps” index by dividing the number of repetitions by the time consumed. The results were as follows:
Time in seconds
Speeds in “Meps”
Library
Parse
Evaluate
Parse
Evaluate
CalcEngine
1.4
1.3
1.04
1.18
NCalc
7.1
5.7
0.21
0.26
Flee
1,283.0
0.5
0.00
2.91
CalcEngine*
10.7
1.5
0.14
0.99
NCalc*
145.2
5.7
0.01
0.27
Some comments about the benchmark results:
CalcEngine performed well, being the fastest parser and the second fastest evaluator (after Flee).
Flee is literally “off the charts” on both counts, almost 900 times slower parsing and 2.5 times faster evaluating than CalcEngine. Because Flee compiles formulas to IL, I expected slow parsing and fast evaluation, but the magnitude of the difference was surprising.
Entries marked with asterisks were performed with optimizations off. They are included to demonstrate the impact of the optimization options.
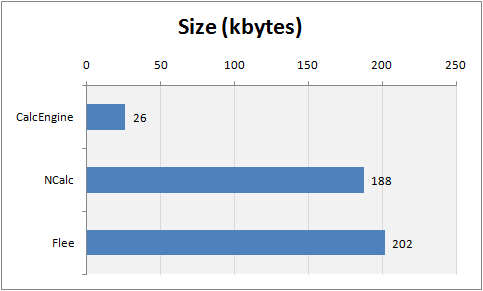
In addition to speed, size is important, especially for Silverlight applications that need to be downloaded to the client machine. Here is a comparison of library sizes:
Library
Size (kB)
CalcEngine
26
NCalc
188
Flee
202
CalcEngine is the smallest library by far, more than seven times smaller than NCalc. If necessary, it could be trimmed even further by removing some of the less important built-in functions.
Conclusion
The CalcEngine class is compact, fast, extensible, and multi-platform. I think it is different enough from NCalc and Flee to add value for many types of projects, especially Silverlight applications like the one it was created for. You can see the Silverlight app in action in the image below.
I hope others will find CalcEngine useful and interesting as well.
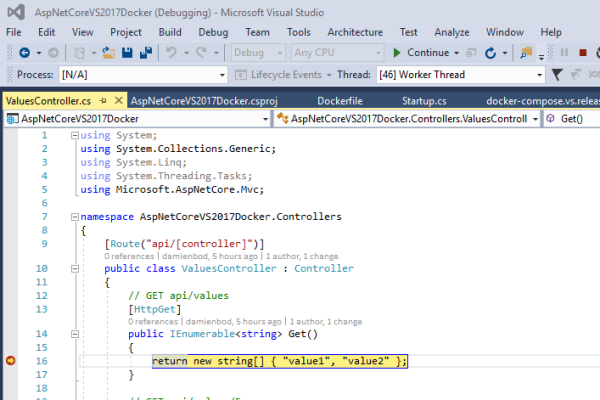
CheapASPNETHostingReview.com | Best and cheap ASP.NET Core 1.1 hosting. This blog shows how to setup a basic ASP.NET Core 1.1 application using Visual studio 2017 and Docker.
Now the application needs to be updated to ASP.NET Core 1.1. Open the csproj file and update the PackageReference and also the TargetFramework to the 1.1 packages and target. At present, there is no help when updating the packages, like the project.json file had, so you need to know exactly what packages to use when updating directly.
Then update the docker-compose.ci.build.yml file. You need to select the required image which can be found on Docker Hub. The microsoft/aspnetcore-build:1.1.0-msbuild image is used here.
CheapASPNETHostingReview.com | Best and cheap ASP.NET MVC hosting. This week I discovered a difficulty related to structuring an ASP.NET MVC web applications one advancement crew was dealing with. The things they have been trying to do was quite straightforward: to create a folder framework each having their particular subfolders for View/Controller/Scripts/CSS and so on. The appliance assets like JS/CSS etc. were not getting rendered properly. The difficulty was owing to NET.config file lying underneath the subfolder, which when moved to the Views folder below that subfolder things went good. The purpose of this post just isn’t to debate regarding the specifics of that difficulty and it is solution.But to discuss regarding how we will very easily framework our ASP.NET MVC Web application as per distinct modules, which is an clear need for just about any big application.
ASP.NET MVC follows the paradigm of “Convention Over Configuration” and default folder structure and naming conventions operates good to get a smaller sized software. But for relatively bigger a single there is a necessity to customise.The framework also offers adequate provisions for the same.You’ll be able to have your personal controller manufacturing facility to get custom methods to making the controller classes and custom see engine for finding the rendering the sights. But when the necessity would be to structure the applying to distinct subfolders as per modules or subsites I believe using “Area” in ASP.NET MVC will likely be useful to make a streamlined software.
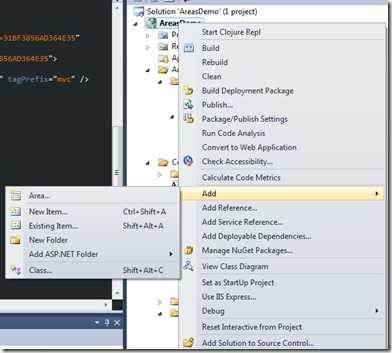
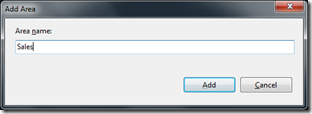
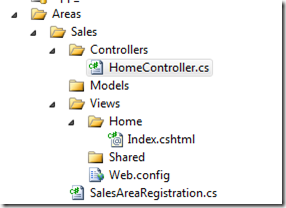
You can add a area to some ASP.NET MVC undertaking in Visual Studio as shown beneath.
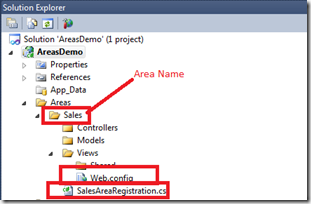
Here I have added an area named “Sales”. As shown in the figure below a folder named “Areas” is created with a subfolder “Sales”. Under “Sales” we can see the following
The standard folder of Models/Views/Controllers
A Web.config under the Views folder. This contains the necessary entries for the RazorViewEngine to function properly
A class named SalesAreaRegistration.
The code (auto generated) for the SalesAreaRegistration class is shown below:
System.Web.Mvc.AreaRegistration may be the summary base class use registering the places to the ASP.NET MVC Web Application. The method void RegisterArea(AreaRegistrationContext context) must be overriden to sign up the realm by providing the route mappings. The class System.Web.Mvc.AreaRegistrationContext encapsulates the mandatory information (like Routes) required to sign-up the area.
In Global.asax.cs Application_Start occasion we must RegisterAllAreas() technique as demonstrated under:
1
AreaRegistration.RegisterAllAreas();
The RegisterAllAreas method looks for all types deriving from AreaRegistration and invokes their RegisterArea method to register the Areas.
Now with the necessary infrastructure code in place I have added a HomeController and Index page for the “Sales” area as shown below.
I have to change the Route Registration for the HomeController to avoid conflicts and provide the namespace information as shown below:
Here I am navigating to the area “Sales” from the main application so I have to provide area information with routeValues. The following overload is being used in the code above: