CheapASPNETHostingReview.com | Best and cheap ASP.NET Core 1.0 hosting. This post is about Bundling and Minification in ASP.NET Core. Bundling and minification are two techniques you can use in ASP.NET to improve page load performance for your web application. Bundling combines multiple files into a single file. Minification performs a variety of different code optimizations to scripts and CSS, which results in smaller payloads. In ASP.NET Core RTM release Microsoft introduced “BundlerMinifier.Core” tool which will help you to bundle and minimize Javascript and style sheet files. Unlike previous versions MVC, the bundling and minification is happening on development time not in runtime. To use “BundlerMinifier.Core” first you need to add reference of BundlerMinifier.Core in the project.json tools section.
Now you need to specify the Javascript and stylesheet files for bundling and minification. You can do this by adding “bundleconfig.json” file. The name can be changed, but if the filename is bundleconfig.json, it will bundle command will take it automatically. Here is a minimal bundleconfig.json file.
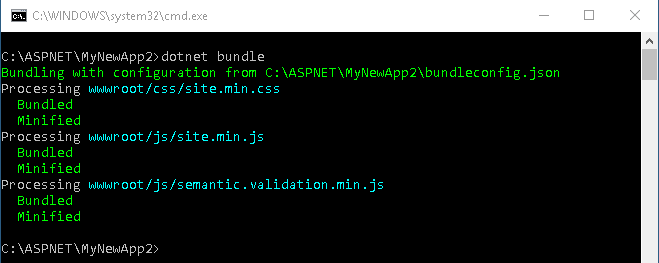
The file is self explantory, you can specify multiple file in the inputFiles element, which will be combined and minified based on the minify element. Now you can combine and minify using “dotnet bundle” command. Here is the output when I run the dotnet bundle command on my MVC project.
You can integrate it to the development lifecycle by adding the dotnet build command in the “precompile” script section in project.json file. If you are using Yo ASP.NET generator, the project template will be using precompile script section in project.json.
There are few more commands also available with dotnet bundle tool.
dotnet bundle clean – Executing dotnet bundle clean will delete all output files from disk.
dotnet bundle watch – To automatically run the bundler when input files change, call dotnet bundle watch. This will monitor any file changes to input files in the working directory and execute the bundler automatically.
dotnet bundle help – Get help on how to use the CLI.
CheapASPNETHostingReview.com | Best and cheap ASP.NET MVC hosting. In this tutorial I will show you about bootstrap in ASP.NET MVC. I use Bootstrap in almost every project I build these days. I build up a custom Bootstrap configuration to reduce bloat, and have my workflow down-pat for updating those configurations (which I’ll write about in the near future). I have familiarised myself with it’s ins-and-outs to help ensure I use it to it’s full potential without being overkill, and it has sped up my HTML build time immensely.
Bootstrap Validation in ASP.NET MVC
One issue I’ve come across before is finding harmony between ASP.Net MVC’s validation and Bootstrap’s validation classes.
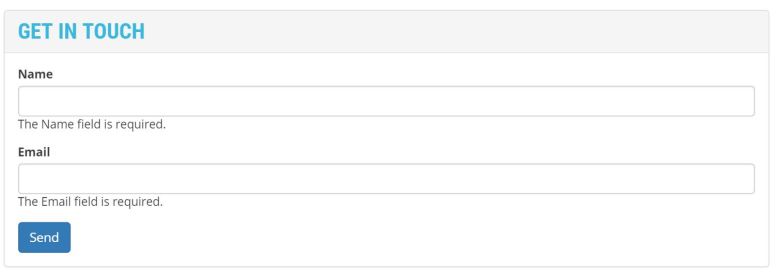
Out of the box when you use Html.ValidationMessageFor() to output a validation (with none of Microsoft’s validation classes set up), this is what I end up with:
Behind the scenes, the Microsoft validation has put an input-validation-error class on the text boxes that failed validation, and the validation message has some classes that can be styled:
<span id="FullName-error"class="">The Name field isrequired.</span>
</span>
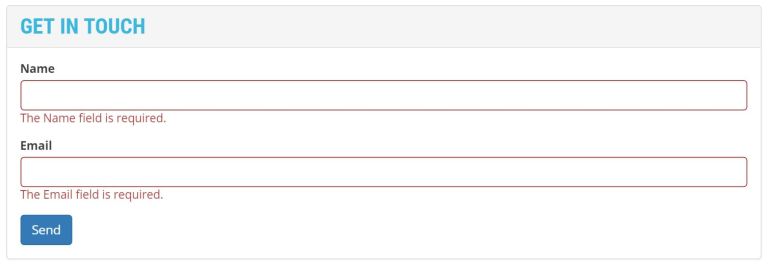
Bootstrap’s method of validation styling is based on the parent’s class (the “form group”), instead of the element itself, thus allowing all children (e.g. labels and text boxes) to have a specific style:
1
2
3
4
<div class="form-group has-error">
<label class="control-label"for="inputError1">Input with error</label>
It’s not difficult to apply the Bootstrap validation classes when model errors exist using a little JavaScript, but I decided to look for a nice NuGet package to do this for me, and I found one – jquery.validate.unobtrusive.bootstrap by Sandro Caseiro. Simply install it via the NuGet Package Manager Console:
I use the bundling in the Microsoft.AspNet.Web.Optimization package, so rather than including the JavaScript library file raw in my view, I already have a validate bundle that will include it since this library has followed the naming convention, being jquery.validate.unobtrusive.bootstrap.js, so I don’t even need to update the BundleConfig.cs file:
This bundle was already being included in my page using the following:
1
@Scripts.Render("~/bundles/jqueryval")
Unfortunately this didn’t work! The jquery.validate.unobtrusive.bootstrap.js was being included, but when I look at the source, it’s being included BEFORE the jquery.validate.unobtrusive.js file:
The problem is that out of the box, the bundling library orders the packages included in the bundle alphabetically when using a wildcard *.
I saw a nice solution to this on someone’s the jquery.validate.unobtrusive.bootstrap GitHub issues page, it involves creating a custom orderer for the bundle:
Step 1: Create a new orderer class (I placed it within the BundleConfig class to keep it local):
The result is that your scripts will be output in order of the “dots” – a kind of heirarchy assumed based on the file naming convention, which works in this particular situation, at least (and it would be great if it worked in general, signifying a naming convention for JavaScript files):
CheapASPNETHostingReview.com | Best and cheap ASP.NET Core hosting. There are two ways to set up an Angular 2 application. The most preferred way is to use angular-cli, which is pretty simple. Unfortunately, the Angular CLI doesn’t use the latest version. The other way is to follow the tutorial on angular.io, which sets up a basic starting point, but this needs a lot of manual steps.
There are also two ways to set up the way you want to develop your app with ASP.NET Core. One way is to separate the client app completely from the server part. It is pretty useful to decouple the server and the client to create almost independent applications and to host on different machines. The other way is to host the client app inside the server app. This is useful for small applications, having everything in one place, and it is easy to deploy on a single server.
In this post, I’m going to show you, how you can set up an Angular 2 app, which will be hosted inside an ASP.NET Core application using Visual Studio 2015. The Angular-CLI is not the right choice here because it already sets up a development environment for you and all that stuff is configured a little bit differently. The effort to move this to Visual Studio would be too much. I will almost follow the tutorial on http://angular.io/. But we need to change some small things to get that stuff working in Visual Studio 2015.
Configure the ASP.NET Core Project
Let’s start with a new ASP.NET Core project based on .NET Core. (The name doesn’t matter, so “WebApplication391” is fine). We need to choose a Web API project because the client side Angular 2 App will probably communicate with that API and we don’t need all the predefined MVC stuff.
A Web API project can’t serve static files like JavaScripts, CSS styles, images, or even HTML files. Therefore we need to add a reference to Microsoft.AspNetCore.StaticFiles in the project.json:
1
"Microsoft.AspNetCore.StaticFiles":"1.0.0 ",
And in the startup.cs, we need to add the following line, just before the call of `UseMvc().
1
app.UseStaticFiles();
Another important thing we need to do in the startup.cs is to support the Routing of Angular 2. If the Browser calls a URL that doesn’t exist on the server, it could be an Angular route. Especially if the URL doesn’t contain a file extension.
This means we need to handle the 404 error, which will occur in such cases. We need to serve the index.html to the client if there was an 404 error on requests without extensions. To do this we just need a simple lambda based MiddleWare, just before we call UseStaticFiles():
Inside the properties folder, we’ll find a file called launchSettings.json. This file is used to configure the behavior of Visual Studio 2015, when we press F5 to run the application. Remove all strings “api/values” from this file, because Visual Studio will always call that specific Web API every time you press F5.
Now we prepared the ASP.NET Core application to start to follow the angular.io tutorial.
Let’s start with the NodeJS packages. Using Visual Studio we can create a new “npm Configuration file” called package.json. Just copy the stuff from the tutorial:
1
2
3
4
5
6
7
8
9
10
11
12
13
14
15
16
17
18
19
20
21
22
23
24
25
26
27
28
29
30
31
32
33
34
35
36
37
38
39
40
41
42
{
"name":"dotnetpro-ecollector",
"version":"1.0.0",
"scripts":{
"start":"tsc && concurrently \"npm run tsc:w\" \"npm run lite\" ",
I added “&& gulp restore” to the postinstall script.
I also added Gulp to the devDependency to typings.
After the file is saved, Visual Studio tries to load all the packages. This works, but VS shows a yellow exclamation point for errors. Until recently, I didn’t figure out what was going wrong here. To be sure all packages are propery installed, use the console, change directory to the current project, and type npm install
The post install will possibly fail because gulp is not yet configured. We need gulp to copy the dependencies to the right location inside the wwwroot folder, because static files will only be loaded from that location. This is not part of the tutorial on angular.io, but is needed to fit the client stuff into Visual Studio. Using Visual Studio we need to create a new “gulp Configuration file” with the name gulpfile.js:
1
2
3
4
5
6
7
8
9
10
11
12
13
14
15
16
17
vargulp=require('gulp');
gulp.task('default',function(){
// place code for your default task here
});
gulp.task('restore',function(){
gulp.src([
'node_modules/@angular/**/*.js',
'node_modules/angular2-in-memory-web-api/*.js',
'node_modules/rxjs/**/*.js',
'node_modules/systemjs/dist/*.js',
'node_modules/zone.js/dist/*.js',
'node_modules/core-js/client/*.js',
'node_modules/reflect-metadata/reflect.js',
'node_modules/jquery/dist/*.js',
'node_modules/bootstrap/dist/**/*.*'
]).pipe(gulp.dest('./wwwroot/libs'));
});
The task restore copies all the needed files to the Folder ./wwwroot/libs
TypeScript needs some type definitions to get the types and API definitions of the libraries, which are not written in TypeScript or not available in TypeScript. To load this, we use another tool, called “typings.” This is already installed with NPM. This tool is a package manager for type definition files. We need to configure this tool with a typings.config
Now we have to configure TypeScript itself. We can also add a new item, using Visual Studio to create a TypeScript configuration file. I would suggest not to use the default content, but rather the contents from the angular.io tutorial.
1
2
3
4
5
6
7
8
9
10
11
12
13
14
15
16
{
"compileOnSave":true,
"compilerOptions":{
"target":"es5",
"module":"commonjs",
"moduleResolution":"node",
"sourceMap":true,
"emitDecoratorMetadata":true,
"experimentalDecorators":true,
"removeComments":false,
"noImplicitAny":false
},
"exclude":[
"node_modules"
]
}
The only things I did with this file were to add the “compileOnSave” flag and to exclude the “node_modules” folder from the TypeScript build, because we don’t need to build containing the TypeScript files and because we moved the needed JavaScript to ./wwwroot/libs.
If you use Git or any other source code repository, you should ignore the files generated out of our TypeScript files. In the case of Git, I simply add another .gitignore to the ./wwwroot/app folder.
1
2
3
#remove generated files
*.js
*.map
We do this because the JavaScript files are only relevant to run the application and should be created automatically in the development environment or on a build server, before deploying the app.
The First App
That is all we need to prepare an ASP.NET Core project in Visual Studio 2015. Let’s start to create the Angular app. The first step is to create an index.html in the folder wwwroot:
As you can see, we load almost all JavaScript files from the libs folder. Except a systemjs.config.js. This file is needed to configure Angular2, to define which module is needed, where to find dependencies, and so on. Create a new JavaScript file, call it systemjs.config.js, and paste the following content into it:
1
2
3
4
5
6
7
8
9
10
11
12
13
14
15
16
17
18
19
20
21
22
23
24
25
26
27
28
29
30
31
32
33
34
35
(function(global){
// map tells the System loader where to look for things
varmap={
'app':'app',
'rxjs':'lib/rxjs',
'@angular':'lib/@angular'
};
// packages tells the System loader how to load when no filename and/or no extension
This file also defines a main entry point which is a main.js. This file is the transpiled TypeScript file main.ts we need to create in the next step. The main.ts bootstraps our Angular 2 app:
We also need to create our first Angular2 component. Create a TypeScript file with the name app.component.ts inside the app folder:
1
2
3
4
5
6
import{Component}from'@angular/core';
@Component({
selector:'my-app',
template:'<h1>My first Angular App in Visual Studio</h1>'
})
exportclassAppComponent{}
Conclusion
I propose to use Visual Studio just for small single-page applications because it gets slower the more dynamic files need to be handled. ASP.NET Core is pretty cool to handle dynamically generated files, but Visual Studio still is not. VS tries to track and manage all the files inside the project, which slows down a lot. One solution is to disable source control in Visual Studio and use an external tool to manage the sources.
Another — even better — solution is not to use Visual Studio for front-end development. In a new project, I propose to separate front-end and back-end development and to use Visual Studio Code for the front-end development or even both. You need to learn a few things about NPM and Gulp, and you need to use a console in this case, but web development will be a lot faster and a lot more lightweight with this approach.
CheapASPNETHostingReview.com | Best and cheap ASP.NET Core 1.0 hosting. ASP.NET Core is a complete rewrite of ASP.NET, targeting .NET Core on Linux and OS X as well as Windows.
Among the many upgrades in the new version is a completely rewritten diagnostic logging pipeline that not only emits interesting events from the framework, but uses structured logging to do so.
Structured Logging in ASP.NET Core
Like Serilog, ASP.NET Core uses message templates (named placeholders in format strings) to capture structured properties along with textual log data:
1
logger.Information("Handled in {Elapsed} ms",timer.ElapsedMilliseconds);
If this event is written out to the console, it will be formatted as plain text:
1
Handled in456ms
This is ideal during development, when a readable text format is preferred.
But, when the logging provider supports structured data, the properties associated with the event can be preserved in a machine-readable form:
1
2
3
4
5
6
{
"MessageTemplate":"Handled in {Elapsed} ms",
"Properties":{
"Elapsed":456
}
}
Armed with structured log data, it’s easy to slice and dice logs with queries like:
1
Elapsed>300
This is a game-changing capability for complex distributed apps, or when log data runs more than a few hundred events in a day.
Setting Up
These instructions assume that you’ve created a new ASP.NET web application using the template in Visual Studio (File > New… > Project > ASP.NET Web Application).
Out of the box it should look something like this:
The packages we’ll install are:
Serilog – a logging framework for structured data
Serilog.Extensions.Logging – an ASP.NET logging provider that implements ASP.NET’s ILogger on top of Serilog
Serilog.Sinks.Seq – a Serilog sink that ships events to Seq over HTTP
To really take advantage of ASP.NET Core’s logging today, you’ll need a complete logging provider like Serilog to handle the task of shipping log events to most back-end storage targets, as only a few basic providers such as a console logger are there today. Over time it’s likely ASP.NET Core will gain more capabilities of its own in this area.
Crucially, all of the packages supporting ASP.NET Core are currently pre-release, so make sure to include the -Pre switch when installing from the Package Manager Console:
1
2
3
Install-PackageSerilog
Install-PackageSerilog.Extensions.Logging
Install-PackageSerilog.Sinks.Seq
Then, the following lines added to Startup.cs will configure the Serilog back-end:
1
2
3
4
5
6
7
8
publicStartup(IHostingEnvironment env)
{
// Configure the Serilog pipeline
Log.Logger=newLoggerConfiguration()
.MinimumLevel.Debug()
.Enrich.FromLogContext()
.WriteTo.Seq("http://localhost:5341")
.CreateLogger();
This assumes you have Seq running locally on your development machine, listening on the default port. Replace http://localhost:5341 with the address of you Seq server if it lives somewhere else.
(Adding Enrich.FromLogContext() here ensures that any events written directly through Serilog will seamlessly pick up correlation ids like RequestId from ASP.NET.)
Finally, also in Startup.cs, add Serilog to the ILoggerFactory that’s passed into the Configure() method:
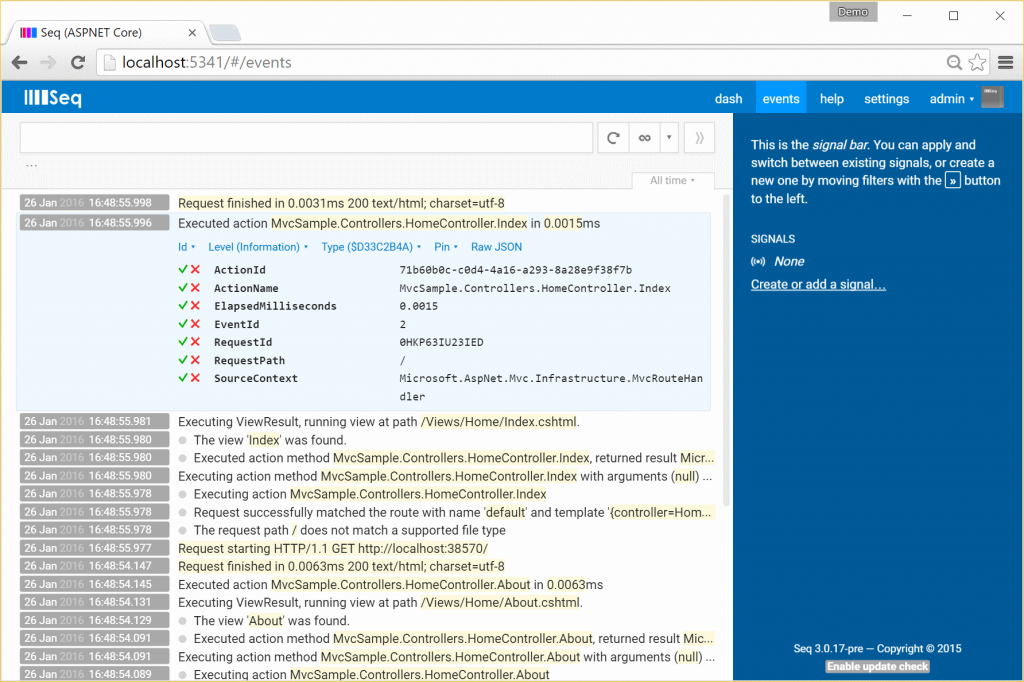
When you refresh the application, all kinds of interesting data from the framework’s inner workings will appear in Seq:
In this screenshot you can see a few familiar MVC processes going on – requests started and finished, actions invoked and views selected.
Writing custom events
It would be interesting, but fairly underwhelming, if the story ended here. The real value in the new logging pipeline is that your own application events get the same treatment.
The simplest way to start logging from your own controllers is to take a dependency on type ILogger<T>:
The T generic parameter is passed so that log events can be tagged with the class that raised them.
ILogger<T> has methods like LogInformation(), LogWarning() and LogError() to write events to the logging pipeline:
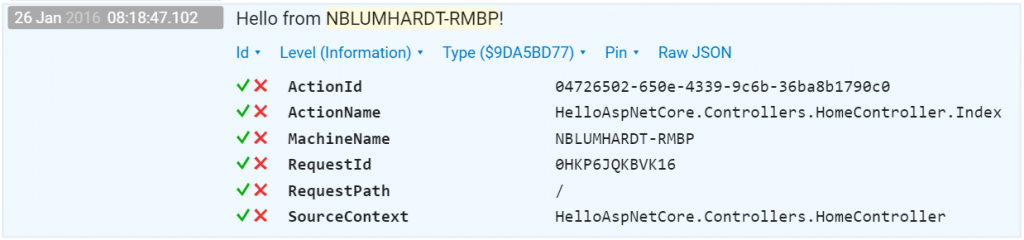
_logger.LogInformation("Hello from {MachineName}!",machine);
returnView();
}
Look carefully at the properties attached to the resulting event:
The first thing to notice is that the MachineName argument we supplied in the format string is there as a first-class property that can be used when searching for events.
The second thing to observe is RequestId – this little gem is added automatically by the ASP.NET framework to all events raised during a web request. Filtering down to a single RequestId will find all events related to just that HTTP request – your own, and the ones raised by the framework. If you don’t use this technique already, it’s something you absolutely must try.
Alternatives for ASP.NET 4.6
Not using ASP.NET Core just yet? Check out the Serilog support for ASP.NET 4.6, which adds a lot of structured logging goodness through a NuGet package.
CheapASPNETHostingReview.com | Best and cheap UK SharePoint 2013 hosting. If you’re looking for the best , affordable and cheap SharePoint 2013 Hosting in UK I recommend you to follow this review.
What is SharePoint 2013 hosting?
Microsoft SharePoint 2013 is a collaboration solution for developing and maintaining customised web services. As the replacement for SharePoint 2010 the new release offers a more simplified user experience and has lots of new features to help you get even more out of your SharePoint sites. New features include increased social media capabilities, e-discovery and support for mobile users.
Cheap UK SharePoint 2013 Hosting Recommendation
Microsoft UK Sharepoint Hosting providers offer a service where a company can set up a communication platform and share information stored in a central database across an entire online community, essentially the origins of document collaboration software. If you’re looking for best and cheap UK Sharepoint Hosting, consider our review to help you find the best SharePoint 2013 hosting in UK.
UKWindowsHostASP.NET is the best UK Windows Hosting provider that offers the most affordable world class windows hosting solutions for you. They are provide shared, reseller, cloud, and dedicated web hosting. Their currently operate servers in four prestiguous cities in Europe, namely: London (UK), Amsterdam (Netherlands), Frankfurt (Germany), Washington DC (US), Paris (France), Singapore and Chennai (India)
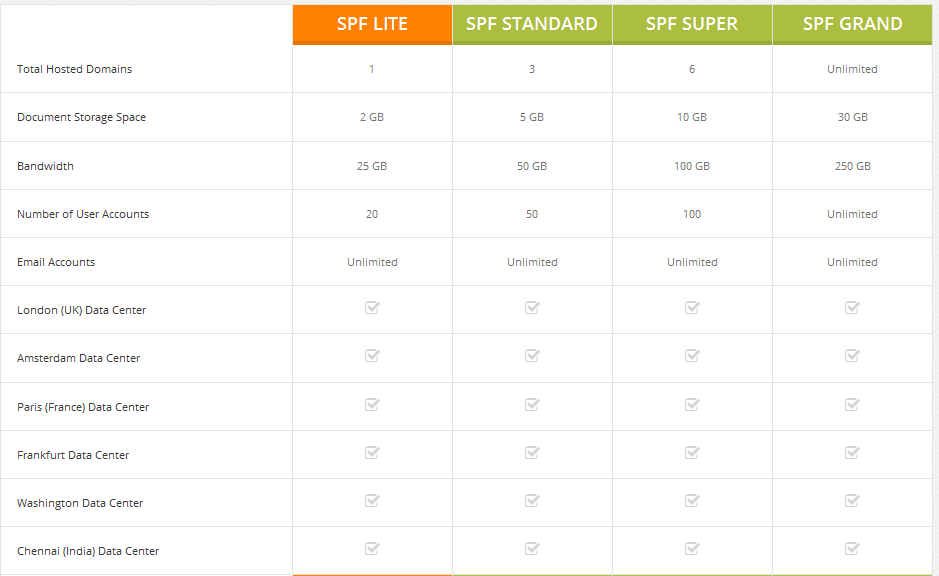
Comparison All Windows SharePoint 2013 Hosting Plans
Why Your Business Needs Microsoft SharePoint 2013 Hosting with UKWindowsHostASP.NET?
UKWindowsHostASP.NET offer advanced and innovative SharePoint services to enable you to effectively organize all aspects of your business information that includes finding documents via workflow collaboration, easy administration, and version control. Their solution is compatible with other Microsoft products, which means you can easily and efficiently manage your tasks, contact lists, and calendars. Get an easy access to manage your meetings and schedules with relevant documentation with UKWindowsHostASP.NET Microsoft SharePoint 2013 hosting services and accelerate your business performance.
Key Features of UKWindowsHostASP.NET Microsoft SharePoint 2013 Hosting includes
Reliability and Control
UKWindowsHostASP.NET offer robust hosting solutions with 99.99% guaranteed uptime. Their team of experts rapidlydeploy SharePoint solution to give you faster return on investment, while delivering quicker service response time.
Scalable
UKWindowsHostASP.NET give you the flexibly to choose programming models and development platforms, while quickly scaling up or down resources in line with your business needs.
High Availability
By using UKWindowsHostASP.NET multiple fault tolerance zones, you experience high business availability. It is an ideal solution for companies that require knowledge-intensive websites with improved team collaboration.
Deployment Time
Their experts plan and phase Microsoft SharePoint deployment to easily run your critical business applications, while significantly reducing the risk of unanticipated outcomes.
Information Security
With UKWindowsHostASP.NET improved document management capabilities, they ensure information integrity to safeguard your mission critical data and applications against vulnerabilities.
CheapASPNETHostingReview.com | Best and cheap ASP.NET Core 1.0 hosting. When errors occur in your ASP.NET Core app, you can handle them in a variety of ways, as described in this article.
The developer exception page
To configure an app to display a page that shows detailed information about exceptions, install the Microsoft.AspNetCore.Diagnostics NuGet package and add a line to the Configure method in the Startup class:
Put UseDeveloperExceptionPage before any middleware you want to catch exceptions in, such as app.UseMvc.
Warning [wp-svg-icons icon=”warning” wrap=”i”]
Enable the developer exception page only when the app is running in the Development environment. You don’t want to share detailed exception information publicly when the app runs in production
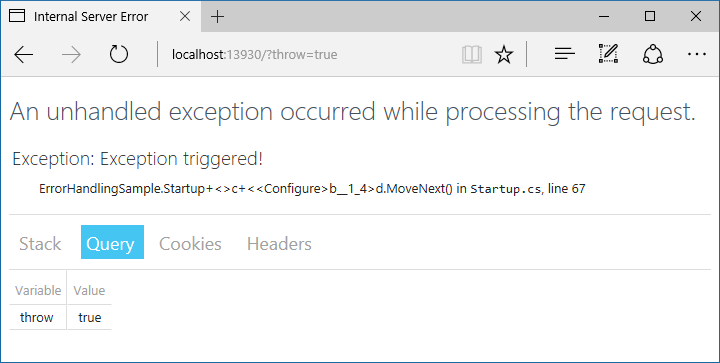
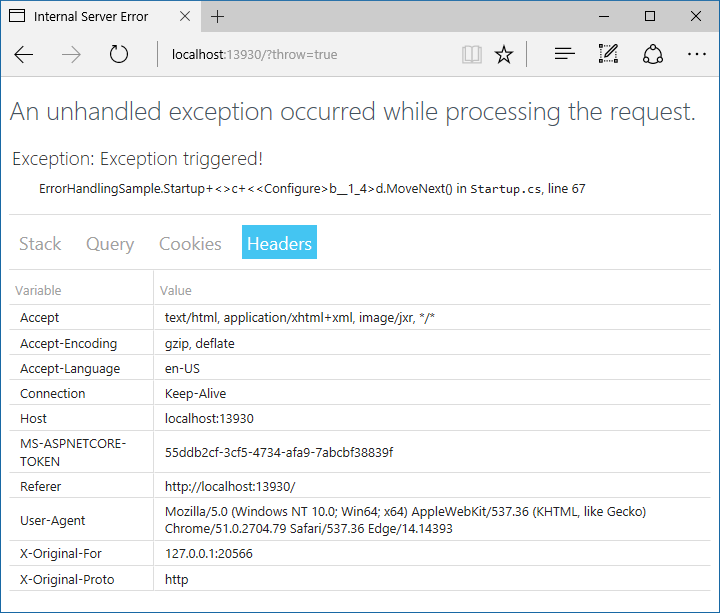
To see the developer exception page, run the sample application with the environment set to Development, and add ?throw=true to the base URL of the app. The page includes several tabs with information about the exception and the request. The first tab includes a stack trace.
The next tab shows the query string parameters, if any.
This request didn’t have any cookies, but if it did, they would appear on the Cookies tab. You can see the headers that were passed in the last tab.
Configuring a custom exception handling page
It’s a good idea to configure an exception handler page to use when the app is not running in the Development environment.
In an MVC app, don’t explicitly decorate the error handler action method with HTTP method attributes, such as HttpGet. Using explicit verbs could prevent some requests from reaching the method.
1
2
3
4
5
[Route("/Error")]
publicIActionResult Index()
{
// Handle error here
}
Configuring status code pages
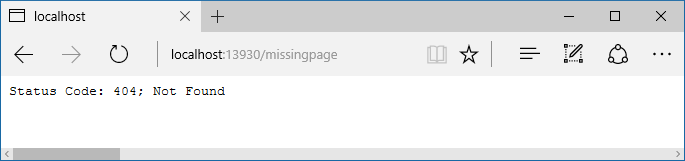
By default, your app will not provide a rich status code page for HTTP status codes such as 500 (Internal Server Error) or 404 (Not Found). You can configure the StatusCodePagesMiddleware by adding a line to the Configure method :
1
app.UseStatusCodePages();
By default, this middleware adds simple, text-only handlers for common status codes, such as 404:+
The middleware supports several different extension methods. One takes a lambda expression, another takes a content type and format string.
app.UseStatusCodePages("text/plain","Status code page, status code: {0}");
There are also redirect extension methods. One sends a 302 status code to the client, and one returns the original status code to the client but also executes the handler for the redirect URL.
Code in exception handling pages can throw exceptions. It’s often a good idea for production error pages to consist of purely static content.
Also, be aware that once the headers for a response have been sent, you can’t change the response’s status code, nor can any exception pages or handlers run. The response must be completed or the connection aborted.
Server exception handling
In addition to the exception handling logic in your app, the server hosting your app will perform some exception handling. If the server catches an exception before the headers have been sent it sends a 500 Internal Server Error response with no body. If it catches an exception after the headers have been sent, it closes the connection. Requests that are not handled by your app will be handled by the server, and any exception that occurs will be handled by the server’s exception handling. Any custom error pages or exception handling middleware or filters you have configured for your app will not affect this behavior.
Startup exception handling
Only the hosting layer can handle exceptions that take place during app startup. Exceptions that occur during app startup can impact server behavior. For example, if an exception happens before you call KestrelServerOptions.UseHttps, the hosting layer catches the exception, starts the server, and displays an error page on the non-SSL port. If an exception happens after that line executes, the error page is served over HTTPS instead.
You can configure how the host will behave in response to errors during startup using CaptureStartupErrors and the detailedErrors key.
ASP.NET MVC error handling
MVC apps have some additional options for handling errors, such as configuring exception filters and performing model validation.
Exception Filters
Exception filters can be configured globally or on a per-controller or per-action basis in an MVC app. These filters handle any unhandled exception that occurs during the execution of a controller action or another filter, and are not called otherwise. Learn more about exception filters in
Tip [wp-svg-icons icon=”pushpin” wrap=”i”]
Exception filters are good for trapping exceptions that occur within MVC actions, but they’re not as flexible as error handling middleware. Prefer middleware for the general case, and use filters only where you need to do error handling differently based on which MVC action was chosen.
Handling Model State Errors
Model validation occurs prior to each controller action being invoked, and it is the action method’s responsibility to inspect ModelState.IsValid and react appropriately.
Some apps will choose to follow a standard convention for dealing with model validation errors, in which case a filter may be an appropriate place to implement such a policy. You should test how your actions behave with invalid model states.
CheapASPNETHostingReview.com | Best and cheap ASP.NET Core RTM 1.0 hosting. In this post I will explain how to setup Visual Studio 2015 in order to develop an Angular 2 RC3 application hosted inside ASP.NET Core project. I of course read the quick start first. You need to make sure to install VS 2015, you can use Community edition of you want. You would also need to install ASP.NET Core.
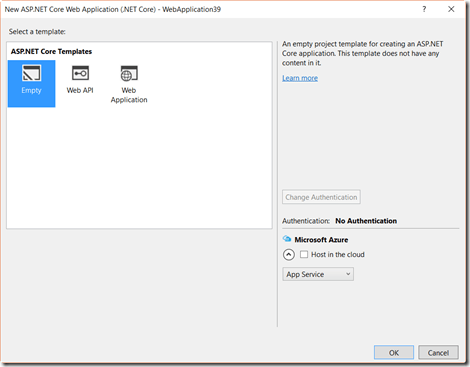
Let’s get started. Create new ASP.NET Core project.
Select empty template to keep everything simple for getting started demo.
Let’s add static files support to serve a plain vanilla HTML page. Open project.json file and add the static files line from below.
I also added support for DotNet.Watcher tools which make it easier to make changes to C# code and have the process automatically compile and restart as needed.
Now we can add a page which will host our Angular app. Again, add just a plain HTML page under wwwroot folder, since that is the root of our deployable Core application. You can just right click on that folder, add new item, then pick HTML page template. I am calling mine index.html. In order to see this page we need to turn off preloaded startup code and replace it with static files server. Open up Startup.cs file and replace Configure method with the following.
1
2
3
4
5
6
7
8
9
10
11
12
13
14
15
16
17
18
19
20
21
22
23
24
publicclassStartup
{
// This method gets called by the runtime. Use this method to add services to the container.
// For more information on how to configure your application, visit http://go.microsoft.com/fwlink/?LinkID=398940
Now we can test the host page. Open up VS command prompt and navigate to the project folder (NOT solution folder). Type “dotnet watch run”. Your app will compile and Kestrel web server with start. Open browser and navigate to http://localhost:5000/index.html. You will see the host page. To make sure edit the index.html page and add some content to it. It is time to start up Angular 2 portion. I like adding NPM support to the project from command line. From the same command prompt type “npm init” to initialize NPM file. Follow the prompts, giving some meaningful answers. Once this is done, switch to visual studio. You will see that dependencies node in project explorer with have npm listed. Right click on that node and select open package.json. We need to add all Angular 2 scripts and dependencies by adding dependencies and devDependencies nodes as shown below.
1
2
3
4
5
6
7
8
9
10
11
12
13
14
15
16
17
18
19
20
21
22
23
24
25
26
27
28
29
30
31
32
33
{
"name":"demo",
"version":"1.0.0",
"description":"",
"main":"index.js",
"scripts":{
"test":"echo \"Error: no test specified\" && exit 1"
},
"author":"",
"license":"ISC",
"dependencies":{
"@angular/common":"2.0.0",
"@angular/compiler":"2.0.0",
"@angular/core":"2.0.0",
"@angular/forms":"2.0.0",
"@angular/http":"2.0.0",
"@angular/platform-browser":"2.0.0",
"@angular/platform-browser-dynamic":"2.0.0",
"@angular/router":"3.0.0",
"systemjs":"0.19.27",
"core-js":"^2.4.1",
"reflect-metadata":"^0.1.3",
"rxjs":"5.0.0-beta.12",
"zone.js":"^0.6.23",
"bootstrap":"^3.3.6"
},
"devDependencies":{
"gulp":"^3.9.1",
"typings":"^1.3.3",
"del":"^2.2.2",
"rimraf":"^2.5.4"
}
}
All packages that start with @angular are angular core packages. This is different from beta versions, which only had a single package. Other packages are supporting packages for angular 2. In order to proving TypeScript support, we will use typings NPM module, which is under devDependencies. Give VS a minute to restore the packages after saving package.json file. If you get an error, just type “npm install” at the command prompt.
Now we need to install code JavaScript typings files for TypeScript. At the same prompt type “typings install –global –save dt~core-js”. Once completed, you will see typings folder in project explorer, with core-js folder under it.
In the next step we will setup compilation options for TypeScript. Add new item to the root of your project, selecting TypeScript Configuration File item template. Change the content to look as follows.
1
2
3
4
5
6
7
8
9
10
11
12
13
14
15
16
17
18
19
{
"compileOnSave":true,
"compilerOptions":{
"target":"es5",
"module":"commonjs",
"moduleResolution":"node",
"sourceMap":true,
"emitDecoratorMetadata":true,
"experimentalDecorators":true,
"removeComments":false,
"noImplicitAny":true,
"suppressImplicitAnyIndexErrors":true
},
"exclude":[
"node_modules",
"wwwroot"
]
}
We are adding decorator options, which are required for Angular 2. We are setting module to use systemjs, which is the default for all the demos I have seen.
Now I am going to setup gulp to make my development flow a bit smoother. If you do not have gulp installed globally, type “npm install gulp” at the command prompt. After that you can add new item to the root of the project, selecting Gulp Configuration File item template. Open gulpfile.js and replace the content with the following.
What is going on here? Third party task copies necessary Angular 2 scripts from node_modules folder to the same folder under wwwroot. Copy task copies our own application files, which will be placed under app folder under project root to wwwroot folder as well. Finally, watch task will monitor the changes to app folder and re-copy the files wwwroot folder by firing copy task. By default we will run all three tasks when we run gulp every time.
Time to write application code. Create new folder called “app” under project root. Now we need to create root component. We will add app.ts file with the following code.
We created a new class called App. It is decorated with a component attribute. We specify the selector or tag that will be replaced with our component. We also specify the HTML that will be injected and bound to the component. The component just has a property and a method to test data binding.
Now we need to create a starting module. Let’s call the file appModule.ts
This class actually does not have any executable code, just a decorator that defines our root module. It imports compile module, BrowserModule, necessary for compiling and bootstrapping Angular code in browser. it contains our single App component that we both declare and bootsrtap, setting it as entry point into the application.
Finally, add new item to shell folder, picking TypeScript file template. Change the name to main. This will be our bootstrapping code for Angular 2 application.
Now we need to configure systemjs module loader. Create new JavaScript file called system.config.js under wwwroot folder. This is the only file we will add there. We could also add it under app folder if we wanted to. Here it its content.
1
2
3
4
5
6
7
8
9
10
11
12
13
14
15
16
17
18
19
20
21
22
23
24
25
26
27
28
29
30
31
32
33
34
35
36
37
38
39
40
41
42
43
44
/**
* System configuration for Angular 2 samples
* Adjust as necessary for your application needs.
*/
(function(global){
// map tells the System loader where to look for things
varmap={
'app':'app',// 'dist',
'@angular':'node_modules/@angular',
'rxjs':'node_modules/rxjs'
};
// packages tells the System loader how to load when no filename and/or no extension
We are specifying our app folder as a package for system js. We are also adding core angular packages, including rxjs, reactive extensions. We are configuring systemjs by calling config method and passing our packages map. Finally we are starting app package. Previously in the same file we specified that the entry point for it is main.js.
It is time to edit our index.chtml page and add the necessary scripts. We will start by creating views folder with some stock files. I am adding _ViewStart.cshtml under Views.
1
2
3
@{
Layout="_Layout";
}
This code just sets up default layout page for all our views. Now we just need default view. I am going to create home folder and single view under it Index.cshtml. Its content is very simple.
1
<app-shell>Loading...</app-shell>
It just contains the tag for our root component. Now the import part of adding out layout page, _Layout.cshtml under Views/Shared folder. It just contains all the necessary libraries.
It also setups up configuration object, which we do not technically need in this sample app, but it is a good illustration on how to inject server side configuration into client side JavaScript. We are keeping node_modules and third party libraries folder, but to be sure, we are not using entire folder, we just compy necessary stuff via gulp (see above).
Time to create C# controller under Controllers folder. We will call it HomeController.
1
2
3
4
5
6
7
8
9
10
11
12
13
14
15
using Microsoft.AspNetCore.Mvc;
// For more information on enabling MVC for empty projects, visit http://go.microsoft.com/fwlink/?LinkID=397860
namespaceWebAppAngular2RTM.Controllers
{
publicclassHomeController:Controller
{
// GET: /<controller>/
publicIActionResult Index()
{
returnView();
}
}
}
You can now build the project in the Visual Studio just in case. Then switch to command prompt, navigate to the folder where our project is (NOT solution). Just make sure you see project.json file. Now we need to run gulp to copy files around. Type “gulp” and let the process finish. Now open second prompt, nvaigate to the same folder and type “dotnet watch run”. This will compile if necessary, start runtime process and watch for any changes. Let this finish as well. Make sure you see something like the following:
1
2
Now listening on:http://localhost:5000
Application started.Press Ctrl+Ctoshut down.
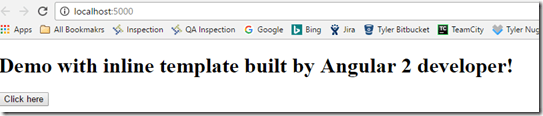
Final step. Open browser and navigate to the URL above. You should see the following.
Feel free to click on a button to make sure the method in your App component got bound properly as well. Also feel free to make changes to the App component and refresh the page to see them.
In this post we achieved a lot. We setup new .Net Core project, created default controller and cshtml page, setup Angular 2 minimal application, setup watcher for .NET and TypeScript code to make changes without manual compilation and ran our project. Quite a bit of work.
CheapASPNETHostingReview.com| Best and cheap ASP.NET Core 1.0 hosting. Suppose you work for a small to midsize company that employs 50-100 workers. The Help Desk — a subsidiary of the Information Services Division — is in charge of trouble tickets regarding general PC issues such as email, viruses, network issues, etc. Initially, the Help Desk team stored this information in Excel spreadsheets, but as the company has grown, managing these spreadsheets has become tedious and time consuming.
The Help Desk has asked you to devise a more efficient solution that could be developed internally, saving the company money. As you start to think about it, the following requirements are apparent: fields for the submitter’s first and last name, as well as their email address. You’ll also need combo boxes for indicating ticket severity (low, medium, high), department, status (new, open, resolved), employee working on the issue, as well as an area for comments. Of all the solutions available, creating an internal help desk Web application with ASP.NET is relatively simple.
In the following article, we’ll see how to implement these features in an ASP.NET help desk Web application using a database-driven approach,
Creating the JavaScript File
Because creating the JavaScript file is the easiest of the work left, we’ll do this next. From the Solution Explorer, follow these steps:
Creating the Help Desk Class
Now that we have our data coming in, we need to be able to record a help desk ticket submission. We need to create an event handler in a class to handle it. Let’s first create a help desk class by doing the following:
Right click the project solution.
Choose Add>New Item.
In the Add New Item window, select Class.cs.
In the name text field, type “HelpDesk” and then click Add.
Double click HelpDesk.cs from the Solution Explorer, which will show the empty class as shown below:
1
2
3
4
5
6
7
8
9
10
using System;
using System.Collections.Generic;
using System.Linq;
using System.Web;
namespaceHelpDesk
{
publicclassHelpDesk
{
}
}
We need to import three libraries as shown below:
1
2
3
4
5
6
7
8
9
10
11
12
13
using System;
using System.Collections.Generic;
using System.Linq;
using System.Web;
using System.Data;
using System.Configuration;
using System.Data.SqlClient;
namespaceHelpDesk
{
publicclassHelpDesk
{
}
}
The first library (System.Data) allows us to work with stored procedures in ADO.NET, the second (System.Configuration) allows us to reference a connection key from configuration file and the last (System.Data.SqlClient) one allows us to connect to SQL Server.
CheapASPNETHostingReview.com | Best and cheap ASP.NET Core 1.0 hosting. The Web.Config is gone and the AppSettings are gone with ASP.NET Core 1.0. How do we configure our ASP.NET Core Application now? With the Web.Config, also the config transform feature is gone. How do we configure a ASP.NET Core Application for specific deployment environments?
Configuring
Unfortunately a newly started ASP.NET Core Application doesn’t include a complete configuration as a sample. This makes the jump-start a little difficult. The new Configuration is quite better than the old one and it would make sense to add some settings by default. Anyway, lets start by creating a new Project. Open the Startup.cs and take a look at the controller. There’s already something like a configuration setup. This is exactly what the newly created application needs to run.
1
2
3
4
5
6
7
8
9
10
11
12
13
14
publicStartup(IHostingEnvironment env)
{
// Set up configuration sources.
varbuilder=newConfigurationBuilder()
.AddJsonFile("appsettings.json")
.AddEnvironmentVariables();
if(env.IsDevelopment())
{
// This will push telemetry data through Application Insights
// pipeline faster, allowing you to view results immediately.
But in the most cases you need much more configuration. This code creates a ConfigurationBuilder and adds a appsettigns.json and environment variables to the ConfigurationBuilder. In development mode, it also adds ApplicationInsights settings. If you take a look into the appsettings.json, you’ll only find a ApplicationInsights key and some logging specific settings (In case you chose a individual authentication you’ll also
see a connection string:
1
2
3
4
5
6
7
8
9
10
11
12
13
{
"ApplicationInsights":{
"InstrumentationKey":""
},
"Logging":{
"IncludeScopes":false,
"LogLevel":{
"Default":"Verbose",
"System":"Information",
"Microsoft":"Information"
}
}
}
Where do we need to store our custom application settings? We can use this appsettings.json or any other JSON file to store our settings. Let’s use the existing one to add a new section called AppSettings:
This looks nice, but how do we read this settings?
In the Startup.cs the Configuration is already built and we could use it like this:
var configurationSection = Configuration.GetSection(“AppSettings”);
var title = configurationSection.Get<string>(“ApplicationTitle”);
var topItmes = configurationSection.Get<int>(“TopItemsOnStart”);
var showLink = configurationSection.Get<bool>(“ShowEditLink”); We can also provide a default value in case that item doesn’t exist or in case it is null
var topItmes = configurationSection.Get<int>(“TopItemsOnStart”, 15);
To use it everywhere we need to register the IConfigurationRoot to the dependency injection container:
But this seems not to be a really useful way to provide the application settings to our application. And it looks almost similar as in the previous ASP.NET Versions. But the new configuration is pretty much better. In previous versions we created a settings facade to encapsulate the settings, to not access the configuration directly and to get typed settings. No we just need to create a simple POCO to provide access to the settings globally inside the application:
1
2
3
4
5
6
publicclassAppSettings
{
publicstringApplicationTitle{get;set;}
publicintTopItemsOnStart{get;set;}
publicboolShowEditLink{get;set;}
}
The properties of this class should match the keys in the configuration section. Is this done we are able to map the section to that AppSettings class:
This fills our AppSettings class with the values from the configuration section. This code also adds the settings to the IoC container and we are now able to use it everywhere in the application by requesting for the IOptions<AppSettings>:
With this approach, you are able to create as many configuration sections as you need and you are able to provide as many settings objects as you need to your application. What do you think about it? Please let me know and drop a comment.
Environment specific configuration
Now we need to have differnt configurations per deployment environment. Let’s assume we have a production, a staging and a development environment where we run our application. All this environments need another configuration, another connections string, mail settings, Azure access keys, whatever… Let’s go back to the Startup.cs to have a look into the constructor. We can use the IHostingEnvironment to load different appsettings.json files per environment. But we can do this in a pretty elegant way:
We can just load another JSON file with an environment specific name and with optional set to true. Let’s say the appsettings.json contain the production and the default
settings and the appsettings.Staging.json contains the staging sepcific settings. It we are running in Staging mode, the second settings file will be loaded and the existing settings will be overridden by the new one. We just need to sepcify the settings we want to override.
Setting the flag optional to true means, the settings file doesn’t need to exist. Whith this approatch you can commit some default setings to the source code repository and the top secret access keys and connections string, could be stored in an appsettings.Development.json, an appsettings.staging.json and an appsettings.Production.json on the buildserver or on the webserver directly.
Conclusion
As you can see, configuration in ASP.NET Core is pretty easy. You just need to know how to do it. Because it is not directly visible in a new project, it is a bit difficult to find the way to start.
CheapASPNETHostingReview.com| Best and cheap ASP.NET MVC 6 hosting. If you create a new MVC 6 project from the default starter template, it will contain the following code in the Startup class, under ConfigureServices method:
1
2
3
// Uncomment the following line to add Web API servcies which makes it easier to port Web API 2 controllers.
// You need to add Microsoft.AspNet.Mvc.WebApiCompatShim package to project.json
// services.AddWebApiConventions();
This pretty much explains it all – the Compatibility Shim is included in an external package, Microsoft.AspNet.Mvc.WebApiCompatShim and by default is switched off for new MVC projects. Once added and enabled, you can also have a look at the UseMvc method, under Configure. This is where central Web API routes can be defined:
1
2
3
4
5
6
7
8
9
app.UseMvc(routes=>
{
routes.MapRoute(
name:"default",
template:"{controller}/{action}/{id?}",
defaults:new{controller="Home",action="Index"});
// Uncomment the following line to add a route for porting Web API 2 controllers.
Since the base class for Web API controllers was not Controller but ApiController, the shim introduces a type of the same name into MVC 6.
While it is obviously not 100% identical to the ApiController from Web API, it contains the majority of public proeprties and methods that you might have gotten used to – the Request property, the User property or a bunch of IHttpActionResult helpers.
Returning HttpResponseMessage
The shim introduces the ability to work with HttpResponseMessage in MVC 6 projects. How is this achieved? First of all, the Microsoft.AspNet.WebApi.Client package is referenced, and that brings in the familiar types – HttpResponseMessage and HttpRequestMessage.
On top of that, an extra formatter is injected into your application – HttpResponseMessageOutputFormatter. This allows you to return HttpResponseMessage from your actions, just like you were used to doing in Web API projects!
How does it work under the hood? Remember, in Web API, returning an instance of HttpResponseMessage bypassed content negotiation and simply forwarded the instance all the way to the hosting layer, which was responsible to convert it to a response that was relevant for a given host.
In the case of MVC 6, the new formatter will grab your HttpResponseMessage and copy its headers and contents onto the Microsoft.AspNet.Http.HttpResponse which is the new abstraction for HTTP response in ASP.NET 5.
As a result such type of an action as the one shown below, is possible in MVC 6, and as a consequence it should be much simpler to migrate your Web API 2 projects.
The shim introduces an HttpRequestMessageModelBinder which allows the same thing to be done under MVC 6. As a result, if you relied on HttpRequestMessage binding in Web API, your code will migrate to MVC 6 fine.
How does it work? The shim will use an intermediary type, HttpRequestMessageFeature, to create an instance of HttpRequestMessage from the ASP.NET 5 HttpContext.
HttpRequestMessage extensions
Since it was very common in the Web API world to use HttpResponseMessage as an action return type, there was a need for a mechanism that allowed easy creation of its instances. This was typically achieved by using the extension methods on the HttpRequestMessage, as they would perform content negotiation for you.
HttpError
If you use/used the CreateErrorResponse method mentioned above, you will end up relying on the HttpError class which is another ghost of the Web API past rejuvenated by the compatibility shim.
HttpError was traditionally used by Web API to serve up error information to the client in a (kind of) standardized way. It contained properties such as ModelState, MessageDetail or StackTrace.
It was used by not just the CreateErrorResponse extension method but also by a bunch of IHttpActionResults – InvalidModelStateResult, ExceptionResult and BadRequestErrorMessageResult. As a result, HttpError is back to facilitate all of these types.