CheapASPNETHostingReview.com | Best and cheap ASP.NET hosting. Securing your ASP.NET MVC application ought to be priority number a single each time you begin a brand new net application. Employing the attributes Authorize and ValidateAntiForgeryToken in every single controller and action will be the only method to stay away from any safety holes. In this post I’ll show you the best way to secure your ASP.NET application by implementing the AuthorizeAttribute and ValidateAntiForgeryTokenAttribute classes.
The basics
In the extremely least, you need to add an [Authorize] attribute to every controller or controller Action in case you would like several of the controller actions to be accessible by anonymous users. As an example, you probably want ALL users to possess access for the login and register actions of one’s web application.
By decorating the HomeController using the Authorize attribute (notice I didn’t specify any user part) the application will avert any unauthenticated user from executing any in the actions in this controller.
1 2 3 4 5 | [Authorize] public class HomeController : Controller { //... } |
The following is an instance of decorating a controller action with all the Authorize attribute, you desire to complete this if you only want to restrict access to a few of the actions in a controller instead of all actions.
1 2 3 4 5 | [Authorize] public ActionResult Create() { //... } |
Safeguarding against Cross-site request forgery attack (CSRF or XSRF)
The Authorize attribute delivers protection which is sufficient in most situations. Nonetheless, there’s security hole with this and therefore it opens your web application for a cross-site request forgery attack. By way of example, right after a user logs into your website the website will concern your browser an authentication token inside a cookie. Every single subsequent request, the browser sends the cookie back for the site to let the web site realize that you are authorized to take what ever action you are taking, so far every thing is very good.
Right here would be the issue with only using the Authorize attribute, let’s say that a user is logged in to your website and then they visit a spam web site by clicking on a hyperlink that points to one more web site which causes a kind post back to your site… this can be negative, your browser will send the authentication cookie to your website generating it seem as when the request came out of your website and initiated by an authenticated user when it genuinely didn’t.
The above situation is known as cross-site request forgery and can be avoided by adding the ValidateAntiForgeryToken attribute offered inside the .NET framework, this attribute is employed to detect regardless of whether a server request has been tampered with.
The initial step would be to add the ValidateAntiForgeryToken attribute to every single Post Action as follows:
1 2 3 4 5 | [HttpPost, Authorize, ValidateAntiForgeryToken] public ActionResult Create() { //... } |
The next step is to add the HtmlHelper strategy @Html.AntiForgeryToken() inside the type within your view.
The way the ValidateAntiForgeryToken attribute operates is by checking to view that the cookie and hidden kind field left by the Html.AntiForgeryToken() HtmlHelper essentially exists and match. If they do not exist or match, it throws an HttpAntiForgeryException shown beneath:
“A essential anti-forgery token was not supplied or was invalid”
By adding the ValidateAntiForgeryToken for your controller actions your internet site will likely be prepared to stop CSRF/XSRF attacks.
Implementing Forms Authentication using Active Directory (AD)
Often times you might run across a project where you need to authenticate users of your website using Active Directory credentials, the good news is that you can use the existing “Account” controller to achieve this, only a few modifications are necessary.
When you create a new MVC Web Application project and choose the Internet Application template, the Account controller is added to the project, you can use this controller with AD to authenticate your users. For the Account controller to work with AD we need to remove all Actions but the following:
- Logon()
- Logon(LogOnModel model, string returnUrl)
- LogOff()
Your Account controller should look like the following after you remove the unnecessary Actions such as ChangePassword, Register, etc.
1 2 3 4 5 6 7 8 9 10 11 12 13 14 15 16 17 18 19 20 21 22 23 24 25 26 27 28 29 30 31 32 33 34 35 36 37 38 39 | public ActionResult LogOn() { return View(); } [HttpPost] public ActionResult LogOn(LogOnModel model, string returnUrl) { if (ModelState.IsValid) { if (Membership.ValidateUser(model.UserName, model.Password)) { FormsAuthentication.SetAuthCookie(model.UserName, model.RememberMe); if (Url.IsLocalUrl(returnUrl) && returnUrl.Length > 1 && returnUrl.StartsWith("/") && !returnUrl.StartsWith("//") && !returnUrl.StartsWith("/\\")) { return Redirect(returnUrl); } else { return RedirectToAction("Index", "Home"); } } else { ModelState.AddModelError("", "The user name or password provided is incorrect"); } } // if we got this far, something failed, redisplay form return View(model); } public ActionResult LogOff() { FormsAuthentication.SignOut(); return RedirectToAction("Index", "Home"); } |
After this, go ahead and clean up the AccountModel as well so the only model class left is the LogOnModel:
1 2 3 4 5 6 7 8 9 10 11 | public class LogOnModel { [Required] [Display(Name = "User name")] public string UserName { get; set; } [Required] [DataType(DataType.Password)] public string Password { get; set; } [Display(Name = "Remember me?")] public string RememberMe { get; set; } } |
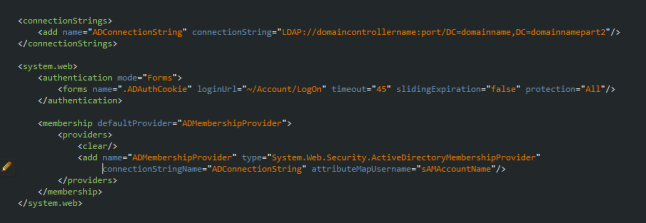
Lastly, add the following to the project’s web.config file: