CheapASPNETHostingReview.com| ASP.NET Core and Azure AD have been kind of my passion for the last year. Naturally with ASP.NET Core 2.0 coming out I wanted to see what had changed in the area of authentication. I made an article on enabling Azure AD authentication in ASP.NET Core 1.0 almost a year ago.
ASP.NET Core 2.0 authentication changes
Many things have changed in 2.0. Authentication is one of them. I will go through changes to other parts in future articles.
In ASP.NET Core 1.X, authentication middleware were registered in the Configure method in the Startup class. That has had a major change. There is now only a single middleware that you add:
1
app.UseAuthentication();
Other middleware, like cookie authentication middleware need not be added.
Instead, authentication is now done through services. You will add them in ConfigureServices. Here for example we add cookie authentication.
1
2
services.AddAuthentication()
.AddCookie();
Another thing that has changed is that we can now define the default authentication/challenge/sign-in handler in one place. You can see an example of the new approach in the next section.
Setting up Azure AD authentication in Startup
In an MVC application that wants to use Azure AD authentication, we need two authentication handlers:
Cookies
Open Id Connect
We can add them to the service collection like this:
1
2
3
services.AddAuthentication()
.AddCookie();
.AddOpenIdConnect();
Cookies is responsible for two things:
Signing the user in (creating the authentication cookie and returning it to the browser)
Authenticating cookies in requests and creating user principals from them
Open Id Connect is responsible for only one thing really: Responding to challenges from [Authorize] or ChallengeResult returned from controllers.
When it receives a challenge, it sends the user to authenticate against the identity provider (in this case Azure AD). When the user gets redirected back to the app, it does a multitude of things to authenticate the returned info, and then requests the default sign-in handler to sign the user in.
Note there that by default, cookie authentication handles authentication and sign-in. Open Id Connect only handles challenges. In 1.X, these would have been defined in the middleware options (except for the default sign-in middleware).
Then we need to add the authentication middleware to Configure as mentioned before:
1
app.UseAuthentication();
For basic scenarios, we are actually almost done. Just one thing missing, the configuration!
Configuring Open Id Connect automatically/slightly manually
Previously we added Open Id Connect authentication like this:
1
services.AddAuthentication().AddOpenIdConnect();
If you check it’s documentation, it says:
Adds OpenIdConnect authentication with options bound against the “OpenIdConnect” section from the IConfiguration in the service container.
So, it expects you have a section like this e.g. in appsettings.json:
If you just need the authentication and no access tokens to APIs etc., the first option with no arguments that auto-binds to the configuration is best.
Otherwise, at least bind options from configuration so you don’t have to type configuration keys manually.
Here is a more complete example of configuring Open Id Connect:
We first bind the configuration section “Authentication” to the Open Id Connect options. Then we setup an event handler for when we get an authorization code from Azure AD. We then exchange it for an access token for Microsoft Graph API.
The token cache class that I made here uses the distributed cache to store tokens. In development that would be a memory-backed cache, but in production it could be backed by a Redis cache or an SQL database.
Now while the handler can acquire an access token, I prefer using ADAL/MSAL as tokens then get cached, and it handles token refresh automatically.
We also setup an exception filter for MVC so that if ADAL token acquisition fails (because the token was not found in cache), we redirect the user to Azure AD to get new tokens. The reason why we use the absolute newest bits (at the time of writing) in the sample app on GitHub, is because Automatic ChallengeBehavior is finally gone in these versions 🙂 Now when you return a ChallengeResult, you get the challenge behaviour every time. If you want to return a 403, you return a ForbidResult.
CheapASPNETHostingReview.com| Best and cheap ASP.NET Core 2.0 hosting. At Build 2017, there were a lot of new features announced for ASP.NET Core 2.0, .NET Core 2.0 and .NET Standard 2.0.
Today, we’re going to look at a few of the changes, specifically: the new configuration model and Razor Pages
Configuration
A lot of the changes that the ASP.NET Core team have brought to ASP.NET Core 2.0 are all about taking the basic application setup and making it as automatic, and quick and easy to change as possible. The first and easiest way that they have done this is by creating the AspNetCore.All package.
AspNetCore.All Package
In previous versions of ASP.NET Core when we’ve created an application and wanted to add in functionality, we’ve had to search on NuGet or using the Package Manager to find the NuGet packages for the functionality that we want.
The AspNetCore.All package is a meta package which pulls down all of the relevant (Anti Forgery, Auth, Entity Framework Core, MVC, Static files, etc.) packages to our application when package restore happens.
Because we no longer have to track down each of these individual packages, our job is made easier. Also, when the packages within the AspNetCore.All package are updated, the updated versions will be included in the AspNetCore.All meta package.
The AspNetCore.All package is included in .NET Core 2.0’s Runtime Store, and is compiled to native code, rather than IL. This means that all of the libraries included in the AspNetCore.All package are pre-compiled as native binaries for the Operating Systems that .NET Core 2.0 supports.
Boot Time Improvements
Dan and Scott were able to show that ASP.NET Core 2.0 applications can cold boot in less than a second, versus up to 7 seconds for ASP.NET Core 1.0 applications.
The ASP.NET Core team have achieved this by shipping the AspNetCore.All package in native code for each platform, and by enabling view pre-compilation. By pre-compiling the views, they no longer have to be compiled at start up.
View pre-compilation is a trick that has been around in .NET Framework for a while, but it isn’t a default build action.
New Program Setup
This leads me nicely onto the new program setup model.
In ASP.NET Core 1.0 the program.cs file contained a single method for configuring and running the server, and there was a lot of manual configuration required. As in the following code block:
1
2
3
4
5
6
7
8
9
10
11
12
13
14
15
16
17
18
19
20
21
using System.IO;
using Microsoft.AspNetCore.Hosting;
using Microsoft.AspNetCore.Builder;
namespaceaspNetCoreOneDemo
{
publicclassProgram
{
publicstaticvoidMain(string[]args)
{
varhost=newWebHostBuilder()
.UseKestrel()
.UseContentRoot(Directory.GetCurrentDirectory())
.UseIISIntegration()
.UseStartup<Startup>()
.Build();
host.Run();
}
}
}
To enable server features, you had to know what those features where called or rely on intellisense in order to find the right methods.
But in ASP.NET Core 2.0, a lot of the configuration is taken care of for us. So much so that the following code snippet is the default program.cs for an ASP.NET Core 2.0 application:
There’s a lot that’s changed here, so let’s look at the changes in turn.
The Constructor and DI
Taking a look at the constructor, we can see that the configuration is Dependency Injected in for us.
1
2
3
4
5
6
7
8
9
10
namespaceAspNetCore2Demo
{
publicclassStartup
{
publicStartup(IConfiguration configuration)
{
Configuration=configuration;
}
publicIConfigurationConfiguration{get;}
This is because all of the explicit configuration that we had to do in ASP.NET Core 1.0 is done automatically for us. ASP.NET Core 1.0 will look for any and all relevant json/ini files and attempt to deserialise them to objects for us and inject them into the IConfiguration object.
The ConfigureServices method is pretty much the same, but the Configure method has been very simplified:
This is because the contents of the appsettings.json are parsed and added into the IConfiguration object which is injected in at the constructor level of the class:
1
2
3
4
5
6
7
8
publicclassStartup
{
publicStartup(IConfiguration configuration)
{
Configuration=configuration;
}
publicIConfigurationConfiguration{get;}
If we take a look at the appsettings.json, we can see that the logging is set up for us there:
1
2
3
4
5
6
7
8
9
10
11
12
13
14
15
{
"Logging":{
"IncludeScopes":false,
"Debug":{
"LogLevel":{
"Default":"Warning"
}
},
"Console":{
"LogLevel":{
"Default":"Warning"
}
}
}
}
And looking at the highlighted lines, we’ll see that logging is set up so that we’ll only get warnings. This can be proven by running the application from the terminal. Doing so, and navigating around in the application, you won’t receive any messages in the terminal other than warnings:
1
2
3
4
5
$dotnet run
Hosting environment:Production
Content root path:/AspNetCore2Demo
Now listening on:http://localhost:5000
Application started.Press Ctrl+Ctoshut down.
However, if we edit the appsettings.json file to match the following:
1
2
3
4
5
6
7
8
9
10
11
12
13
14
15
{
"Logging":{
"IncludeScopes":false,
"Debug":{
"LogLevel":{
"Default":"Information"
}
},
"Console":{
"LogLevel":{
"Default":"Information"
}
}
}
}
Then re-run the application and click around, we’ll see the familiar log messages again:
Its entirely up to the developer and their needs as to which level of logging they require. I prefer information logging when I’m developing and to switch to warnings once I’ve published, but your requirements may be different.
Razor Pages
The other big new thing in ASP.NET Core 2.0 is the concept of Razor Pages. Razor Pages are enabled by default, as they are a feature of MVC, thus the following line in the startup.cs enables them:
Razor Pages cover the situations when creating a full blown Controller, View and a Model for a single or small number of pages seem a little over kill. Take for instance a simple homepage with no controller required, presumably something which could be handled by a static page, but which should have a simple model.
An example of this can be seen in the ASP.NET Core Web App (Razor Pages) template, which is installed as part of the .NET Core 2.0 preview1:
ASP.NET Core Web App(Model-View-Controller)mvc[C#], F# Web/MVC
ASP.NET Core Web App(Razor Pages)razor[C#] Web/MVC/Razor Pages
ASP.NET Core Web API webapi[C#] Web/WebAPI
Nuget Config nugetconfig Config
Web Config webconfig Config
Solution File sln Solution
Razor Page page Web/ASP.NET
MVC ViewImports viewimports Web/ASP.NET
MVC ViewStart viewstart Web/ASP.NET
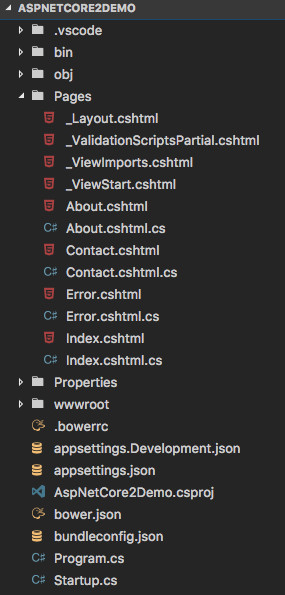
Taking a look at the directory structure for this new template, we can see that the new Razor Pages are located within the Pages directory.
Routing
Before we take a look at the contents of one of the Razor Pages, it will be worth covering how the routing for Razor Pages works. The request URL for a Razor Page is mapped to it’s path within the Pages directory – the Pages directory being the default location which the Runtime checks for any Razor Pages which could match the requested URL.
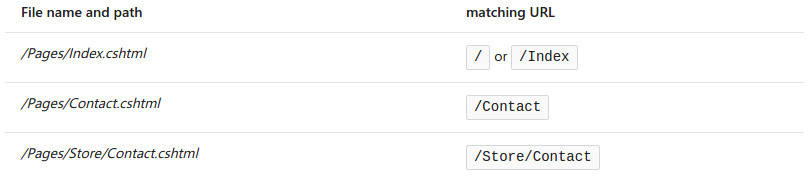
The following table shows a few examples of how the location of Razor Pages maps to requests: