Cheap Docker Tutorial – Docker for Windows Server 2016

Cheap Docker Tutorial – Docker for Windows Server 2016

CheapASPNETHostingReview.com | As you know Microsoft is announcing general availability of Windows Server 2016 at the Ignite conference in Atlanta. For Windows developers and IT-pros, the most exciting new Windows feature is containers, and containers on Windows Server 2016 are powered by Docker. In this post details the technical innovations that went into making Docker containers run natively on Windows and attempts to explain the significance of the achievement.

Docker has completely transformed how Linux developers and ops build, ship and run apps. With Docker Engine and containers now available natively on Windows, developers and IT-pros can begin the same transformation for Windows-based apps and infrastructure and start reaping the same benefits: better security, more agility, and improved portability and freedom to move on-prem apps to the cloud.

For developers and IT-pros that build and maintain heterogenous deployments with both Linux and Windows infrastructure, Docker on Windows holds even greater significance: The Docker platform now represents a single set of tools, APIs and image formats for managing both Linux and Windows apps. As Linux and Windows apps and servers are dockerized, developers and IT-pros can bridge the operating system divide with shared Docker terminology and interfaces for managing and evolving complex microservices deployments both on-prem and in the cloud.

How To Run Containers on Windows Server

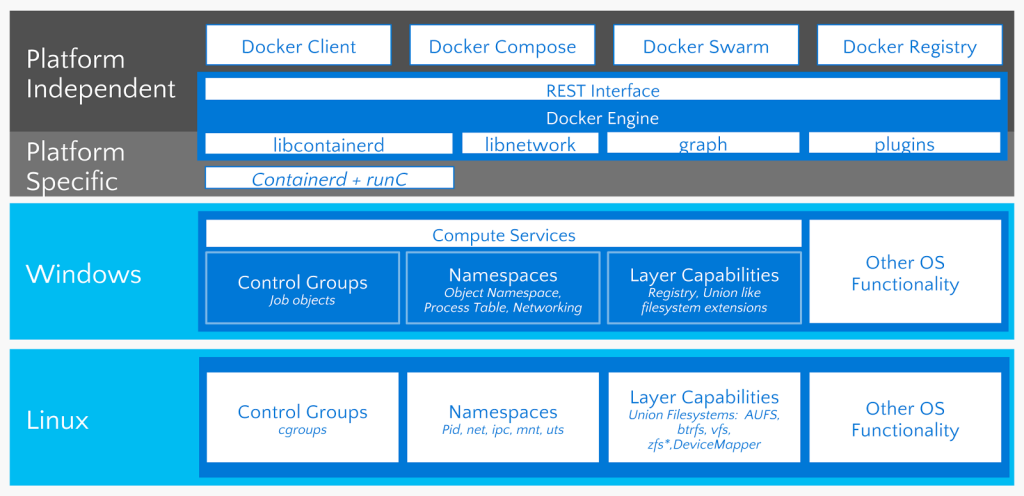
Docker running containers on Windows is the result of a two-year collaboration between Microsoft that involved the Windows kernel growing containerization primitives, Docker and Microsoft collaborating on porting the Docker Engine and CLI to Windows to take advantage of those new primitives and Docker adding multi-arch image support to Docker Hub.

The result is that the awesome power of docker run to quickly start a fresh and fully isolated container is now available natively on Windows:

The kernel containerization features are available in all versions of Windows Server 2016, and are also on Windows 10 systems with the Anniversary Update, and the Windows-native Docker daemon runs on both Windows Server 2016 and Windows 10 (although only containers based on Windows Server build and run on Windows 10).

docker run on Windows comes with the same semantics as on Linux: Full process isolation and sandboxed filesystem (and Windows Registry!) with support for layering changes. Each container sees a clean Windows system and cannot interfere with other processes (containerized or not) on the system.

For example, two dockerized apps using different Internet Information Services (IIS) versions and different .NET frameworks can co-exist merrily on the same system. They can even write to their respective filesystems and registries without affecting each other.

With containerization, Windows IT-pros get most of the isolation and release-artifact-stability benefits of VMs, without the resource overhead and lost agility inherent in hardware virtualization.

Similar to how containers on Linux can run with different security profiles, containers on Windows run in one of two isolation modes:

  1. Windows Server Containers use the same shared-kernel process-isolation paradigm known from Linux. Since containers run as normal (but isolated) processes, startup is fast and resource overhead is minimal.
  2. With Hyper-V isolation, container processes run inside a very minimal hypervisor created during container start. This yields potentially better isolation at the cost of slower startup and some resource overhead.

Isolation can be set with a simple switch passed to docker run:

As long as the underlying host supports the requested isolation mode, any Windows container image can be run as either a hyper-v or server container and a container host can run both side by side. Container processes are oblivious to the isolation mode they run in, and the Docker control API is the same for both modes.

This makes isolation mode not generally a developer concern and developers should use the default or what’s convenient on their system. Isolation mode does give IT-pros options when choosing how to deploy containerized apps in production.

Also note that, while Hyper-V is the runtime technology powering hyper-v isolation, hyper-v isolated containers are not Hyper-V VMs and cannot be managed with classic Hyper-V tools.

Building Windows Container Images

Thanks to layering improvements to the Windows Registry and filesystem, docker build and Dockerfiles are fully supported for creating Windows Docker images.

Note how PowerShell is used to install and setup zip files and exes: Windows containers run Windows executables compiled for Windows APIs. To build and run a Windows container, a Windows system is required. While the Docker tools, control APIs and image formats are the same on Windows and Linux, a Docker Windows container won’t run on a Linux system and vice-versa.

Also note that the starting layer is microsoft/windowsservercore. Starting FROM scratch is not an option when creating Windows container images. Instead, images are based on either microsoft/windowsservercore or microsoft/nanoserver.

The Windows Server Core image comes with a mostly complete userland with the processes and DLLs found on a standard Windows Server Core install. With the exception of GUI apps and apps requiring Windows Remote Desktop, most apps that run on Windows Server can be dockerized to run in an image based on microsoft/windowsservercore with minimal effort. Examples include Microsoft SQL Server, Apache, Internet Information Services (IIS) and the full .NET framework.

1dockerwin

This flexibility comes at the cost of some bulk: The microsoft/windowsservercore image takes up 10GB. Thanks to Docker’s highly efficient image layering, this is not a big problem in practice. Any given Docker host only needs to pull the base layer once, and any images pulled or built on that system simply reuse the base layer.

The other base layer option is Nano Server, a new and very minimal Windows version with a pared-down Windows API. Lots of software already runs on Nano Server, including IIS, the new .NET Core framework, Node.js and Go. And the Nano Server base image is an order of magnitude smaller than Windows Server Core, meaning it has less dependencies and surface area to keep updated. Nano Server is an exciting development, not only as a base for minimal containers that build and boot quickly, but also as a Minimalist Operating System that makes for a great container host OS running just the Docker daemon and containers, and nothing else.

With the choice of Windows Server Core and Nano Server, developers and IT-pros can opt to lift-and-shift existing Windows-based apps into Server Core containers or adopt Nano Server for greenfield development or incrementally as part of breaking monolithic apps into microservices components.

Docker is working with Microsoft and the community to build container images based on both Windows Server Core and Nano Server. Golang, Python and Mongo are available as official Docker images (more are on their way), and Microsoft also maintains a set of very popular sample images.

Save

How To Use Docker with Plesk Onyx

How To Use Docker with Plesk Onyx

CheapASPNETHostingReview.com | In this post I will explain you how  to use docker with plesk onyx. Docker is a platform for distributed applications for developers and system administrators that allows running applications in containers. It enables you to use specific software, such as Redis or MongoDB, or a specific version of software, which might not be supported by your operating system or might need compiling.

Docker is installed as a Plesk component. Plesk allows you to run and manage containers that are based on specific Docker images, and to use Docker not only on the local host, but also on the specified remote machine.

Note: This functionality is not supported in Plesk installations running on Windows Server 2008.

How to Start Using Docker

If you did not select Docker when installing Plesk, you can enable it in Home > Tools & Settings > Updates & Upgrades.

To start using it, go to Docker in the left navigation panel.

The Image Catalog

In the catalog (Docker > Docker Image Catalog), Plesk displays images from https://hub.docker.com/explore. By default, only recommended images are displayed. To view more images, use the search box or filters.

For each application, multiple versions can be available. You can run a specific version by selecting the appropriate tag, as shown below:

dc1

To use filters:

  1. Click the arrow  next to the search box.
  2. Specify both or one of the following: image name and repository.

    The repositories that you can select:

    • Local repository – contains local images. These are images that were already downloaded and now stored on the server with Docker. For details, see Managing Local Images further in this section.
    • Docker Hub – https://hub.docker.com/explore.

To run a container:

  1. Go to Docker > Docker Image Catalog.
  2. Use the search box or filters to quickly find applications in the catalog.
  3. To view application description and documentation on Docker Hub, click the image name. This does not apply to local images.
  4. To run a specific version, click the arrow next to the Run button, and select the application version.
  5. To run the latest version of the selected application, click Run.

    If the image is stored locally, the button looks like Run (local).

    Plesk creates a container and prompts you to specify its settings, such as environment variables, and then runs it. You can cancel running by clicking Cancel on the Settings screen. For details about the settings, see Container Settings further on this page.

  6. The container appears in the list of containers at the top of the Docker Catalog page.

dc2

See the log (Logs) to find out what settings the container needs to run successfully.

Note: If you want to change container settings, you do not need to stop the container: When you save new settings, Plesk recreates the container.

To edit container settings, go to Settings or Details > Settings.

dc3

Automatic Start

If the option Automatic start after system reboot is not selected, then after system reboot the websites that use this container might be down, and you will need to start the container manually.

Port Mapping

By default, Automatic port mapping is turned on and the container’s internal port is mapped to a random port on the host system (for example, 32768).

To change the port on the host system, clear the option Automatic port mapping and specify another external port in Manual mapping. If no Manual mapping appears when you clear the check box, it means that the container does not expose ports.

Important: If port mapping is configured, Docker binds to the specified port on all network interfaces of the host system. Usually, this means that the application can be accessed from anywhere. Docker presumes that authentication is carried out by the application itself, but sometimes it is not so (for example, MySQL does not allow anonymous access by default, but redis does). Plesk cannot determine what service is installed in a specific Docker container, and cannot control access to it. If you need to prohibit access to the application from outside Plesk, do it manually using the firewall on the host system.

Volume Mapping

Docker volumes are directories on your server mounted to a Docker container, so that you have persistent storage that can be accessed from your host system. The data in Docker volumes can be backed up, and, more important, it is not deleted when you stop or delete a container.

To add a volume mapping, specify the following:

  • In the first (left) box – the path to the directory on the server that you want to mount to the container.
  • In the second (right) box (marked as Source) – the path to a directory inside the container.

To map more directories, click Add Mapping.

Setting Environment Variables

Environment variables are used by the application inside a container. You might need to add more variables or edit existing variables. Plesk allows you to add as many variables as required.

Operations with Containers

You can do the following with containers:

  • Restart (Restart) or stop (Stop) a container. In these cases, the container will be recreated with the current settings.

Note: If you did not save the data to the mounted volumes (see the Volume Mapping section below), the data will be lost.

  • View logs and resource consumption (Details).
  • Change container settings, such as environment variables or volume mapping (Settings or Details > Settings).

    In Plesk on CentOS, you can set a memory limit for a container (Settings > Memory limit).

  • Rename a container (Settings > Container name).
  • Recreate a container using the same or another version of the image (Details > Recreate).
  • Create an image based on a container with your custom settings (Details > Save as Image).
  • Take a snapshot of a container (Details > Download a Snapshot).
  • Remove a container (Remove or Details > Remove).
Recreating a Container

Usually, you need to recreate a container when you want to update the application to a newer version. In fact, you can rebuild a container using any application version available in the catalog, not only a newer one.

Custom settings are preserved during recreation. To preserve data used by the application inside a container, you should specify volume mapping before you recreate a container. Volume mapping enables you to have access to directories used inside a container

To recreate a container:

  1. Go to Docker and click Details below the container you want to recreate.
  2. Click Recreate in the container settings and specify the image version, and whether to use default environment variables.

Using Remote Docker

By default, Plesk uses Docker installed as a Plesk component. However, you can use one or more Docker services installed outside of Plesk. Note that you can use only one service at a time. The hostname of the selected server is displayed in the title of Docker Catalog in Plesk.

Important: Managing remote Docker services requires a Plesk license key add-on. Without this add-on, you can only manage the local Docker service, which is running on the Plesk server.

Configuring Remote Services

Configure the remote server that runs Docker as described in the Docker documentation to use it as a remote server in Plesk.

Managing Remote Services

The following steps are applicable to both Plesk for Linux and for Windows.

To start using Docker that runs on a remote host:

  1. Go to Tools & Settings > Docker (under Server Management).
  2. Click Add Server and specify the settings of the remote server with Docker.
  3. To start using this Docker service in Plesk, leave Set active selected.

The link to Docker will appear in the left navigation panel.

To switch between Docker services:

  1. Go to Tools & Settings > Docker (under Server Management).
  2. In the list of servers select the server that you are going to use and click Set Active.

Alternatively, you can set the server as active while editing its settings.

dc5

Creating Images with Custom Settings

If you want to create a new image based on the changes that you made to the contents of a container, use the Save as Image command. It takes a snapshot of your container, which appears as a new image in the image catalog. In this way, you can create images with custom settings such as environment variables.

To create an image from one of your containers:

Go to Docker > Details under the container name > Save as Image, and optionally specify:

  • Image name. By default, an ID will be generated and used as the name.
  • Tag. You can specify the image version here. By default, the version will be “latest”.

The created image appears in the image catalog and is marked Local image.

Managing Local Images

Local images are images that are stored by Docker on local disk, so there is no need to download them from the Image Catalog.

An image becomes local in the following situations:

  • You selected any version (tag) of an image and the image started downloading. Either you later run a container or cancel running (in the Settings screen), the image is saved locally.
  • You upload an image to Docker catalog in Plesk (Upload Image in Docker Image Catalog).
  • You created a custom image from a container
  • You built an image using the command-line interface.

If Docker has at least one downloaded version from a group of versions belonging to an image, this image is marked Local image in the catalog. Run (local) means that the latest version was already downloaded. Plesk also shows how many local images exist for a product.

dc6

To view local images and remove outdated local images:

  1. Go to Docker > Docker Image Catalog.
  2. To find all local images, click the arrow next to the search box and select Local in the Repository filter.
  3. To view all local images of a specific product, click the link under the product name. All local images’ tags and occupied disk space will be displayed.

dc7

  • To remove all images, click Clean All Images.
  • To remove a specific image, click the Remove [wp-svg-icons icon=”close” wrap=”i”] icon next to the image that you want to remove

Setting up nginx to Proxy Requests from Domains to a Container

Some Docker containers expose ports so that applications in containers could be accessible via those ports.

When you use an application in Docker container on your website, you may find inconvenient to specify the non-standard port in its URL. To avoid inconvenience, you can set up nginx to proxy requests from domains to that port, so domains can use a standard port (such as 80) and there is no need to explicitly specify the port in URL.

Requirements

  • nginx must be running in Plesk.
  • You must map the port inside a container to some port on the host system (for example, 32768) manually (Docker > select a container > Settings > clear the option Automatic port mapping).

After you have mapped the port inside a container manually to some port on your system (for example, 32768), you can set up nginx to proxy requests from domains to that port, so domains can use a standard port on nginx (for example, 80). To make it possible, add a rule for nginx in the domain settings in the following way:

Go to Websites & Domains > the domain > Proxy Rules > Add Rule and specify the following:

  • URL. Specify the URL of the website that uses an application running in a container. It can be either the main website or a part of it.
  • Container. Select the application running as a Docker container.
  • Port. Select one of the mappings that was specified in the container settings (a port inside a container mapped to a port on your system). Nginx will proxy requests to the port on the system.

Save