Using multiple hosting environments on the same machine in ASP.NET Core

CheapASPNETHostingReview.com | Best and cheap ASP.NET Core hosting. This short post about how to set the hosting environment in ASP.NET Core.

However, if this is a capability you think you will need, you can use a similar approach to the one I use in that post to set the environment using command line arguments.

This approach involves building a new IConfiguration object, and passing that in to the WebHostBuilder on application startup. This lets you load configuration from any source, just as you would in your normal startup method, and pass that configuration to the WebHostBuilder using UseConfiguration. The WebHostBuilder will look for a key named "Environment" in this configuration, and use that as the environment.

For example, if you use the following configuration.

 You can pass any setting value with this setup, including the “environment variable”:

This is fine if you can use command line arguments like this, but what if you want to use environment variables? Again, the problem is that they’re shared between all apps on a machine.

However, you can use a similar approach, coupled with the UseEnvironment extension method, to set a different environment for each machine. This will override the ASPNETCORE_ENVIRONMENT value, if it exists, with the value you provide for this application alone. No other applications on the machine will be affected.

To test this out, I added the MYCOOLPROJECT_ENVIRONMENT key with a value of Staging to the launch.json file VS uses when running the app:

Running the app using F5, shows that we have correctly picked up the Staging value using our custom environment variable:

With this approach you can effectively have a per-app environment variable that you can use to configure the environment for an app individually.

Summary

On shared hosting, you may be in a situation when you want to use a different IHostingEnvironment for multiple apps on the same machine. You can achieve this with the approach outlined in this post, building an IConfiguration object and passing a key to WebHostBuilder.UseEnvironment extension method.

How To Route Constraints In ASP.NET Core

How To Route Constraints In ASP.NET Core

logo

CheapASPNETHostingReview.com | Best and cheap ASP.NET Core. Route Constraints can be a handy way to distinguish between similar route names, and in some cases, pre-filter out “junk” requests from actually hitting your actions and taking up resources. A route constraint can be as simple as enforcing that an ID that you expect in a URL is an integer, or as complicated as regex matching on strings.

An important thing to remember is that route constraints are not a way to “validate” input. Any server side validation you wish to occur should still happen regardless of any route constraints set up. Importantly, know that if a route constraint is not met than a 404 is returned, rather than a 400 bad request you would typically expect to see from a validation failure.

Type Constraints

Type constraints are a simple way to ensure that a parameter can be cast to a certain value type. Consider the following code :

At first glance you might assume that if you called “/api/controller/abc” that the route would not match – It would make sense since the id parameter is an integer. But infact what happens is that the route is matched and the id is bound as 0. This is where route constraints come in. Consider the following :

Now if the id in the URL is not able to be cast to an integer, the route is not matched.

You can do this type of constraints with int, float, decimal, double, long, guid, bool and datetime.

Size Constraints

There are two types of “size” constraints you can use in routes. The first is to do with strings and means you can set a minimum length, max length or even a range.

This sets a minimum length for the string value. You can also use maxlength to limit the length.

Alternatively, you can set how many characters a string can be within a range using the length property.

While that’s great for string variables, for integers you can use the min/max/range constraints in a similar fashion.

Regex Constraints

Regex constraints are a great way to limit a string input. By now most should know exactly what regex is so there isn’t much point doing a deep dive on how to format your regex, just throw it in as a constraint and away it goes.

It is worth noting there for whatever reason, the .NET core team added another handy “quick” way of doing alpha characters only instead of regex. There you can just use the constraint of “alpha”.

How To Implementing simple token authentication in ASP.NET Core with OpenIddict

How To Implementing simple token authentication in ASP.NET Core with OpenIddict

CheapASPNETHostingReview.com | Best and cheap ASP.NET Core 1.0 hosting. Good news! While the first OpenIddict alpha bits were tied to Identity, the two have been completely decoupled as part of OpenIddict beta1 and beta2. Concretely, this means you can now use OpenIddict with your own authentication method or your own membership stack.


Get started

Register the aspnet-contrib feed

Before coding, you’ll have to register the aspnet-contrib MyGet feed, where the preliminary OpenIddict beta bits are currently hosted. For that, create a new NuGet.config at the root of your solution:

Update your project.json to reference the OpenIddict packages

For this demo, you’ll need to reference 4 packages:

  • AspNet.Security.OAuth.Validation, that provides the authentication middleware needed to validate the access tokens issued by OpenIddict.
  • OpenIddict, that references the OpenID Connect server middleware and provides the logic required to validate token requests.
  • OpenIddict.EntityFrameworkCore, that contains the default EntityFramework stores.
  • OpenIddict.Mvc, that provides an ASP.NET Core MVC binder allowing to use OpenIdConnectRequest as an action parameter.

Add OpenIddict in the ASP.NET Core application

Register the OpenIddict services in the dependency injection container

Register OpenIddict and the validation middleware in the ASP.NET Core pipeline

Make sure to always register the validation middleware very early in your pipeline: if the validation middleware is not at the right place, requests won’t be correctly authenticated when reaching the next middleware (e.g MVC).

The same remark applies to OpenIddict, that must be inserted before MVC to validate token requests before they reach your own code. If you don’t register it correctly, an exception will be thrown at runtime.

Create your own token authentication controller

Create an API controller

Test your ASP.NET Core application

Retrieve an access token from your authentication controller

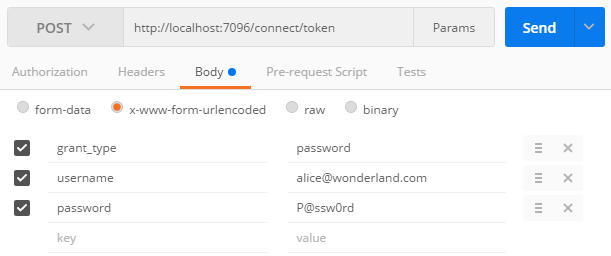
To retrieve an access token, send a POST request to /connect/token with the grant_type=password parameter and the user credentials:

token-request

If the credentials are valid, you’ll get a JSON response containing the access token:

Query your API controller using a bearer token

To send an authenticated request, simply attach the bearer token to the Authorization header using the following syntax: Authorization: Bearer [your bearer token] (without the square brackets)

api-request

If the access token is valid, you’ll get a JSON payload containing the user details returned by the API:

How To Create ASP.NET Core Web API in Visual Studio 2015

How To Create ASP.NET Core Web API in Visual Studio 2015

CheapASPNETHostingReview.com | Best and cheap ASP.NET Core 1.0 hosting. This tutorial lets us create very basic ASP.NET Core Web API using Visual Studio 2015. We will be creating Contacts API which lets do popular CRUD operations.

ASP.NET Web API is a framework that makes it easy to build HTTP services that reach a broad range of clients, including browsers and mobile devices.

ASP.NET Web API is an ideal platform for building RESTful applications on the .NET Framework. Update 12/10 – Updated to ASP.NET Core 1.0 with EF Core

Step 1 : Contacts API Overview

The Contacts API is very simple, basic Web API which does CRUD operations. I have focused on writing web API rather than integrating it with databases.  This table summaries Contacts API which we’ll create

tble

Step 2: Create ASP.NET Core Web API project

Install ASP.NET Core 1.0

Open Visual Studio 2015 Update 3, create “New Project” with name “ContactsApi

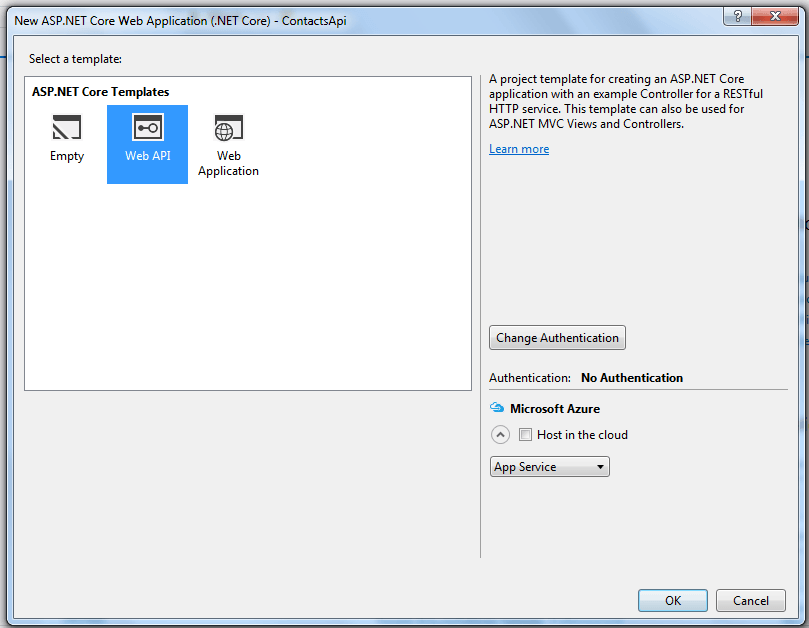
From ASP.NET Core templates select “Web API” as shown in image (I haven’t selected any Authentication, we will add them later)

apiFirst

Program.cs is newly added file, it’s entry point when application run, that’s right public static void main(). ASP.NET Core apps are considered as console apps.

Step 3: Packages included for ASP.NET Core Web API

The packages included are “MVC”, “EnvironmentalVariables”, “JSON”, “Logging”. (This is generated by default, do not copy this)

Step 4: Creating Contacts model

Contacts class is centre of this Web API project. Its POCO class containing some properties which are self explanatory.

Right click “ContactsApi” solution, create folder “Models“; under this “Models” folder create C# class “Contacts.cs” and copy this code

Step 5: Create and Register repository class for Contacts

The use of repository classes is really optional, but I have added it so that we can connect to any databases later.

Create “Repository” folder under “ContactsApi” solution, we will add one C# interface file and C# class file implementing this interface.

Create “IContactsRepository.cs” interface file in “Repository” folder and copy below code

Create “ContactsRepository.cs” class file, implement “IContactsRepository” and copy below code

ASP.NET MVC 6 provides out of box support for Dependency Injection, we will include that in our “ConfigureServices” method of Startup.cs.  We will see entire code in Step 7

Step 6: Add Contacts API Controller

Its time to add the controller API which acts as Web API. Create “Controllers” folder under “ContactsApi” project solution and add C# class file “ContactsController.cs“; copy below code

Some quick notes of this ContactsController

  1. [Route(“api/[controller]”)] – this used attribute based routing to access the ASP.NET Core Web API.
  2. ContactsRepo is instantiated using dependency injection which we configure in services.cs.
  3. GetAll() is simple HttpGet method which gets all contacts
  4. GetById fetches contact based on mobile phone. Its given HttpGet with Name attribute so that we can use that in Create method to be used for location header.
  5. Create method after inserting contact, returns 201 response and provides location header.

Note: HTTP Status codes are now written as BadReqest(), NotFound()Unauthorized() etc

Step 7: Enable CamelCasePropertyNamesContractResolver

Any Web Api (REST based) should return JSON response in form of Camel Case so that we can sure consume the API in any client. We need to enable CamelCasePropertyNamesContractResolver in Configure Services.

Here is the Startup.cs file which has all code needed for running this Contacts ASP.NET Core Web API.