CheapASPNETHostingReview.com | Best and cheap SharePoint 2013 Hosting. Search Engine Optimisation can be a very tricky thing to get right with any website. I’m not going to repeat what’s been said before on hundreds of blogs dedicated to the topic of SEO. Instead, I’m going to show you a few simple things you can do with your SharePoint Online website which will help you get started with your quest for the search rankings.
1. Use the SEO Tools Provided
This might sound obvious, but remember to use the tools that are provided. You don’t have to just jump straight into code to get started with your SEO. SharePoint Online Public website gives you a couple of tools to manage your Meta tags, as well as allowing you to choose custom URLs for pages.
Metadata
Why:
HTML Meta tags used to be the most recognised way to bump a page up in the search results page. Meta tags influence has been greatly reduced by most search engines, and they probably won’t help you increase your search ranking. However, it has been suggested that leaving out Meta tags can negatively impact your search ranking. This means it’s still well worth adding Meta tags to the page; this is especially the case with your SharePoint Online Public website, as it has been made incredibly easy to add keywords to your pages.
How:
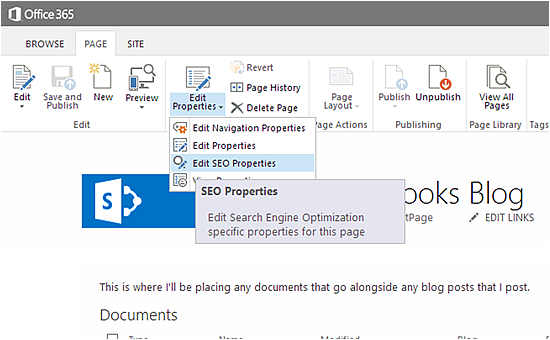
To manage your Keywords, go to any page and select “Page” from the ribbon. From here, you can go to Edit Properties > Edit SEO Properties.
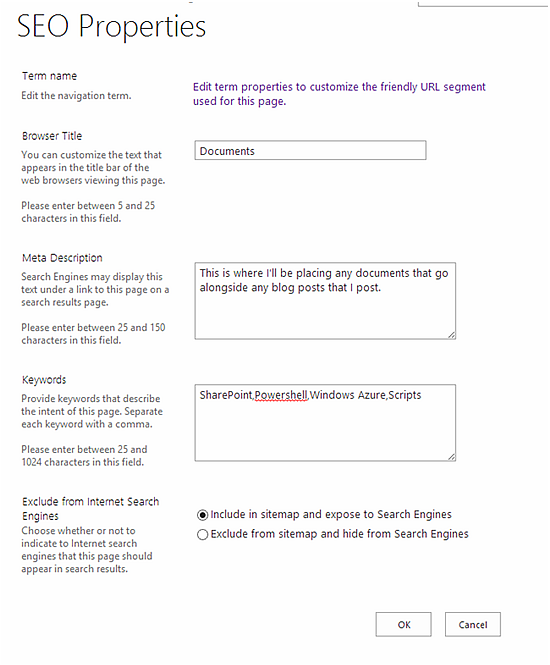
This will open a page that allows you to manage the pages’ Title Tag, Meta Description, and Keywords. It also allows you to choose to show the page in the sitemap, or hide it from the sitemap.
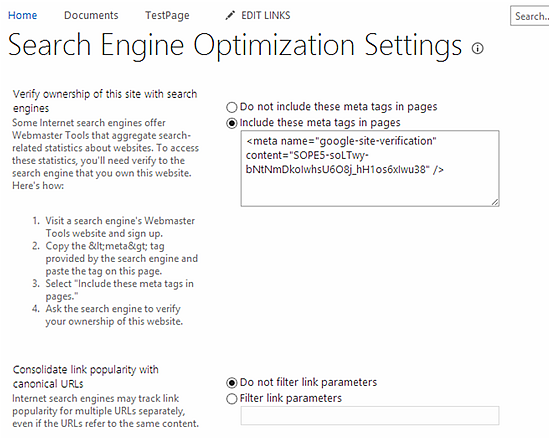
You can also manage site-wide Meta tags by going to Site Settings > Search engine optimization settings. This page lets you add Meta tags to the whole of your site. In their example, it is useful for verifying your site for “Some Internet search engines” and their webmaster tools. You can then choose whether to actually use the Meta tags or not.
Page URLS
Why:
The URL of a page can sometimes play a significant role in the discoverability of a site. If a URL is kept short, simple and relevant, it makes it easier for both search engines to describe the content, and users to remember the link to get straight back to that content.
How:
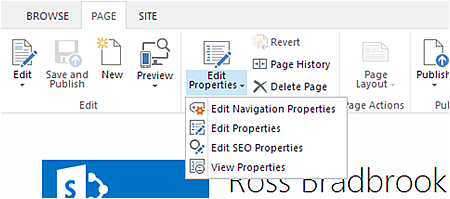
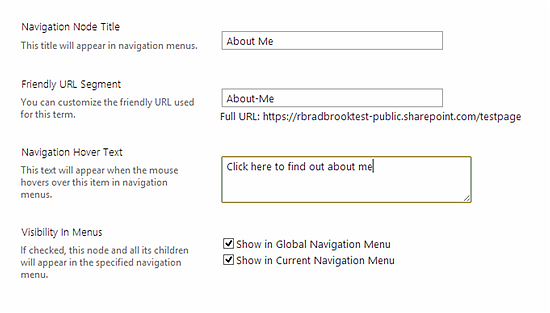
Changing the URL in SharePoint has been made very easy in SharePoint 2013. You can update any pages URL by navigating to the page, opening it edit mode, and clicking Edit Properties > Edit Navigation Properties
From here, you can select your new URL. This screen also lets you update how the page appears in your sites navigation. In the example below, the new URL would be https://rbradbrooktest-public.sharepoint.com/About-Me. This negates the need for the “/pages/” that you would normally see in a SharePoint URL. You can also give it some descriptive text which will appear when you hover over it in the navigation. Again, it’s usually good to make this text descriptive, including keywords that are relevant to the destination page.
2. Change the Robots.txt File
Why:
The robots.txt file defines what content a search crawler is and is not allowed to index. This doesn’t mean that a user cannot get to that content; it just means that a search engine should never display that page when a user searches for your site. Again, this is another fairly obvious one if you’ve ever done any SEO work before. However, you may be wondering how you get to the Robots.txt file in the SP website.
How:
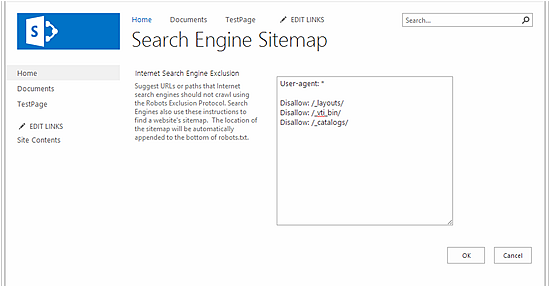
You can get to this by going to Site Settings > Search Engine Sitemap Settings. SharePoint will have already set up a couple of the obvious one’s for you.
At this point, you can disallow any of the pages, or directories that you don’t want to be crawled. I’d recommend disallowing the crawling of any List pages, if that content is already being surfaced somewhere else on your site. This is mainly because it’s of no use to your site visitors, but it could also potentially be seen as spam content. This is because it’s likely to be very keyword heavy, and also very similar (content wise) to the page that it is being surfaced on.
3. Only use apps when necessary
Why:
One of the best new features of SharePoint is the introduction of the App Store. This is very powerful, and can allow a huge amount of customisation to a site with very little effort. However, due to the way that the apps work, all of the content in an App is actually stored in a separate page. The content which is shown on the page is actually just an iframe. This means that when many web crawlers look at the page, they won’t see the content that is there. My advice would be to put as much content as possible on the page itself, whether that means typing the content into the page fields, or using web parts which render the content on the page itself. Use Apps only for supplementary content, and visual aids.
4. Create (or download) a Simple Master page
Why:
The default master pages that are provided on SharePoint Public Websites are the same master pages that are used for internal SharePoint sites. This means that there is a lot of extra code in the master page which can mean sloppy HTML, and unnecessary file downloads. If you customise your master page, you can ensure that you have cleaner code, and make use of better Meta tags and micro formats to increase the machine readability of your site.
5. Consider your Documents too
Why:
In many circumstances, the main content which a site is offering is actually stored in documents, and not in web pages. This content comes in forms of PDFs and Word documents to name but a few. If you want this content to be indexed, you must think about how a search engine will find it. If you are just uploading a document to a document library, will it ever be read? There are 2 quick ways of improving the chances of somebody finding this document
How:
The first way is to ensure your document names contain keywords describing the contents of the document. For example, the URL for a pdf uploaded to your documents library may look something like this: ‘/documents/blog-improve-sharepoint-site-seo.pdf’. This means that the content of the document is clear to both your site users and a search engine.
My second tip to improve the way you offer documents, is to ensure that you are linking to your documents from other places in your site. This is a general rule for any type of site, however it is especially relevant for SharePoint 2013. Document libraries and Lists are often rendered with Client Side Rendering in SharePoint 2013. What does this mean to SEO? When the page loads, none of the content from your document library is rendered as HTML. Instead, a large JavaScript object is created, and then transformed into HTML dynamically after the page has downloaded. This will mean that a search engine will not easily be able to read this list or library.
This can be seen if you look at the snippet that Google shows for some of your pages. Whilst I was writing this blog, I noticed that page with the Documents app on was displaying as : “javascript:commonShowModalDialog(‘{SiteUrl}’+ ‘/_layouts/15/itemexpiration.aspx’ +’?ID={ItemId}&List={ListId}’, ‘center:1;dialogHeight:500px”. This is useless to a user, and does not inform them what this page is about. By following the tips above about Meta tags, this may prevent this from happening, however it will still not find the links to the document. Instead you should be linking directly to the document. When you do this, it’s also a good idea to set the text of the link to some keywords, rather than just “download” or something equally ambiguous. This again help search engines get an idea of what the document is about. Using the same example as above, you may want to make your link read “Improve your SharePoint Site SEO”.


