CheapASPNETHostingReview.com | Best and cheap ASP.NET Core 1.0 hosting. This tutorial lets us create very basic ASP.NET Core Web API using Visual Studio 2015. We will be creating Contacts API which lets do popular CRUD operations.
ASP.NET Web API is a framework that makes it easy to build HTTP services that reach a broad range of clients, including browsers and mobile devices.
ASP.NET Web API is an ideal platform for building RESTful applications on the .NET Framework. Update 12/10 – Updated to ASP.NET Core 1.0 with EF Core
Step 1 : Contacts API Overview
The Contacts API is very simple, basic Web API which does CRUD operations. I have focused on writing web API rather than integrating it with databases. This table summaries Contacts API which we’ll create
Step 2: Create ASP.NET Core Web API project
Install ASP.NET Core 1.0
Open Visual Studio 2015 Update 3, create “New Project” with name “ContactsApi”
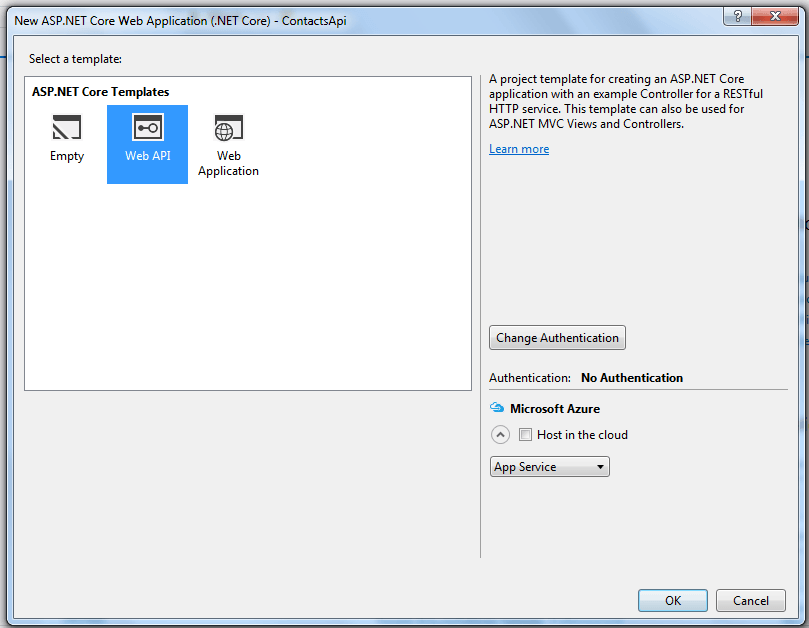
From ASP.NET Core templates select “Web API” as shown in image (I haven’t selected any Authentication, we will add them later)
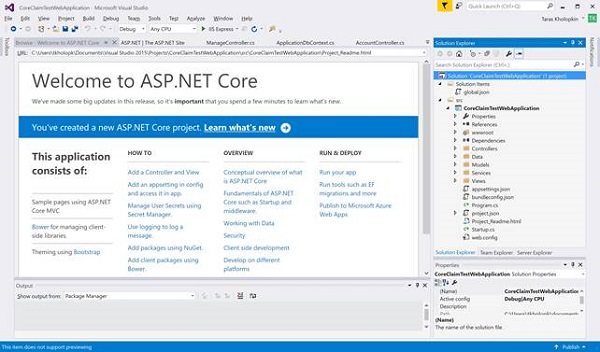
Program.cs is newly added file, it’s entry point when application run, that’s right public static void main(). ASP.NET Core apps are considered as console apps.
Step 3: Packages included for ASP.NET Core Web API
The packages included are “MVC”, “EnvironmentalVariables”, “JSON”, “Logging”. (This is generated by default, do not copy this)
1 2 3 4 5 6 7 8 9 10 11 12 13 14 15 | "dependencies": { "Microsoft.NETCore.App": { "version": "1.0.1", "type": "platform" }, "Microsoft.AspNetCore.Mvc": "1.0.1", "Microsoft.AspNetCore.Routing": "1.0.1", "Microsoft.AspNetCore.Server.IISIntegration": "1.0.0", "Microsoft.AspNetCore.Server.Kestrel": "1.0.1", "Microsoft.Extensions.Configuration.EnvironmentVariables": "1.0.0", "Microsoft.Extensions.Configuration.FileExtensions": "1.0.0", "Microsoft.Extensions.Configuration.Json": "1.0.0", "Microsoft.Extensions.Logging": "1.0.0", "Microsoft.Extensions.Logging.Console": "1.0.0", "Microsoft.Extensions.Logging.Debug": "1.0.0", |
Step 4: Creating Contacts model
Contacts class is centre of this Web API project. Its POCO class containing some properties which are self explanatory.
Right click “ContactsApi” solution, create folder “Models“; under this “Models” folder create C# class “Contacts.cs” and copy this code
1 2 3 4 5 6 7 8 9 10 11 12 13 14 15 16 17 | using System; namespace ContactsApi.Models { public class Contacts { public string FirstName { get; set; } public string LastName { get; set; } public bool IsFamilyMember { get; set; } public string Company { get; set; } public string JobTitle { get; set; } public string Email { get; set; } public string MobilePhone { get; set; } public DateTime DateOfBirth { get; set; } public DateTime AnniversaryDate { get; set; } } } |
Step 5: Create and Register repository class for Contacts
The use of repository classes is really optional, but I have added it so that we can connect to any databases later.
Create “Repository” folder under “ContactsApi” solution, we will add one C# interface file and C# class file implementing this interface.
Create “IContactsRepository.cs” interface file in “Repository” folder and copy below code
1 2 3 4 5 6 7 8 9 10 11 12 13 14 | using ContactsApi.Models; using System.Collections.Generic; namespace ContactsApi.Repository { public interface IContactsRepository { void Add(Contacts item); IEnumerable<Contacts> GetAll(); Contacts Find(string key); void Remove(string Id); void Update(Contacts item); } } |
Create “ContactsRepository.cs” class file, implement “IContactsRepository” and copy below code
1 2 3 4 5 6 7 8 9 10 11 12 13 14 15 16 17 18 19 20 21 22 23 24 25 26 27 28 29 30 31 32 33 34 35 36 37 38 39 40 41 42 43 44 45 46 47 48 49 50 51 52 | using System.Collections.Generic; using System.Linq; using ContactsApi.Models; namespace ContactsApi.Repository { public class ContactsRepository : IContactsRepository { static List<Contacts> ContactsList = new List<Contacts>(); public void Add(Contacts item) { ContactsList.Add(item); } public Contacts Find(string key) { return ContactsList .Where(e => e.MobilePhone.Equals(key)) .SingleOrDefault(); } public IEnumerable<Contacts> GetAll() { return ContactsList; } public void Remove(string Id) { var itemToRemove = ContactsList.SingleOrDefault(r => r.MobilePhone == Id); if (itemToRemove != null) ContactsList.Remove(itemToRemove); } public void Update(Contacts item) { var itemToUpdate = ContactsList.SingleOrDefault(r => r.MobilePhone == item.MobilePhone); if (itemToUpdate != null) { itemToUpdate.FirstName = item.FirstName; itemToUpdate.LastName = item.LastName; itemToUpdate.IsFamilyMember = item.IsFamilyMember; itemToUpdate.Company = item.Company; itemToUpdate.JobTitle = item.JobTitle; itemToUpdate.Email = item.Email; itemToUpdate.MobilePhone = item.MobilePhone; itemToUpdate.DateOfBirth = item.DateOfBirth; itemToUpdate.AnniversaryDate = item.AnniversaryDate; } } } } |
ASP.NET MVC 6 provides out of box support for Dependency Injection, we will include that in our “ConfigureServices” method of Startup.cs. We will see entire code in Step 7
Step 6: Add Contacts API Controller
Its time to add the controller API which acts as Web API. Create “Controllers” folder under “ContactsApi” project solution and add C# class file “ContactsController.cs“; copy below code
1 2 3 4 5 6 7 8 9 10 11 12 13 14 15 16 17 18 19 20 21 22 23 24 25 26 27 28 29 30 31 32 33 34 35 36 37 38 39 40 41 42 43 44 45 46 47 48 49 50 51 52 53 54 55 56 57 58 59 60 61 62 63 64 65 66 67 68 69 | using ContactsApi.Models; using ContactsApi.Repository; using Microsoft.AspNetCore.Mvc; using System.Collections.Generic; namespace ContactsApi.Controllers { [Route("api/[controller]")] public class ContactsController : Controller { public IContactsRepository ContactsRepo { get; set; } public ContactsController(IContactsRepository _repo) { ContactsRepo = _repo; } [HttpGet] public IEnumerable<Contacts> GetAll() { return ContactsRepo.GetAll(); } [HttpGet("{id}", Name = "GetContacts")] public IActionResult GetById(string id) { var item = ContactsRepo.Find(id); if (item == null) { return NotFound(); } return new ObjectResult(item); } [HttpPost] public IActionResult Create([FromBody] Contacts item) { if (item == null) { return BadRequest(); } ContactsRepo.Add(item); return CreatedAtRoute("GetContacts", new { Controller = "Contacts", id = item.MobilePhone }, item); } [HttpPut("{id}")] public IActionResult Update(string id, [FromBody] Contacts item) { if (item == null) { return BadRequest(); } var contactObj = ContactsRepo.Find(id); if (contactObj == null) { return NotFound(); } ContactsRepo.Update(item); return new NoContentResult(); } [HttpDelete("{id}")] public void Delete(string id) { ContactsRepo.Remove(id); } } } |
Some quick notes of this ContactsController
- [Route(“api/[controller]”)] – this used attribute based routing to access the ASP.NET Core Web API.
- ContactsRepo is instantiated using dependency injection which we configure in services.cs.
- GetAll() is simple HttpGet method which gets all contacts
- GetById fetches contact based on mobile phone. Its given HttpGet with Name attribute so that we can use that in Create method to be used for location header.
- Create method after inserting contact, returns 201 response and provides location header.
Note: HTTP Status codes are now written as BadReqest(), NotFound(), Unauthorized() etc
Step 7: Enable CamelCasePropertyNamesContractResolver
Any Web Api (REST based) should return JSON response in form of Camel Case so that we can sure consume the API in any client. We need to enable CamelCasePropertyNamesContractResolver in Configure Services.
Here is the Startup.cs file which has all code needed for running this Contacts ASP.NET Core Web API.
1 2 3 4 5 6 7 8 9 | public void ConfigureServices(IServiceCollection services) { // Add framework services. services.AddMvc() .AddJsonOptions(a => a.SerializerSettings.ContractResolver = new CamelCasePropertyNamesContractResolver()); ; //using Dependency Injection services.AddSingleton<IContactsRepository, ContactsRepository>(); } |


