

CheapASPNETHostingReview.com | Cheap and reliable ASP.NET Core 1.0 RC2 hosting. In this post I will show you how to create ASP.NET Core 1.0 RC2 App from Scratch.
So the first things that you have to do is install RC2
If you haven’t already, install Preview 1 tooling for Microsoft .NET Core 1.0.0 RC2
https://visualstudiogallery.msdn.microsoft.com/c94a02e9-f2e9-4bad-a952-a63a967e3935?SRC=VSIDE
Then create your web app
Open up Visual Studio and select File > New > Project. If you have Core 1 RC2 installed you should see and exciting new category under Templates > Visual C# called .Net Core!
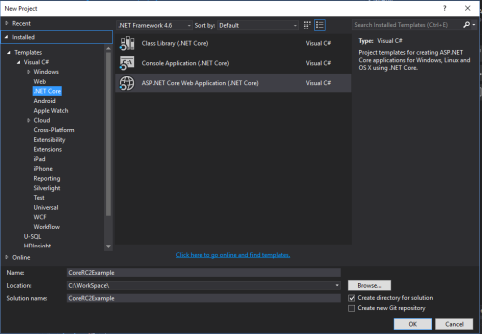
Select “ASP.NET Core Web Application”, give it a name, and click “OK”.
Setup Project.json
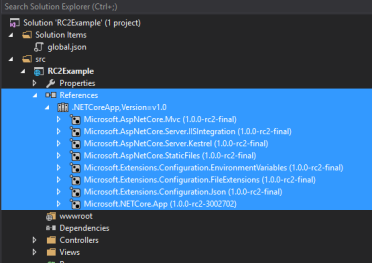
Open up your project.json file. This will be new to you if you haven’t played with previous releases of vNext.
To create a basic MVC app you will need to add the following dependencies to project.json:
- “Microsoft.AspNetCore.Mvc”: “1.0.0-rc2-final”
- “Microsoft.AspNetCore.StaticFiles”: “1.0.0-rc2-final”
- “Microsoft.Extensions.Configuration.FileExtensions”: “1.0.0-rc2-final”
- “Microsoft.Extensions.Configuration.Json”: “1.0.0-rc2-final”
- “Microsoft.Extensions.Configuration.EnvironmentVariables”: “1.0.0-rc2-final”
And you will need to make sure “buildOptions: preserveCompilationContext” is set to true. After making these changes, your project.json should now look like this:
1 2 3 4 5 6 7 8 9 10 11 12 13 14 15 16 17 18 19 20 21 22 23 24 25 26 27 28 29 30 31 32 33 34 35 36 37 38 39 40 41 42 43 44 45 46 47 48 49 50 51 52 | { "dependencies": { "Microsoft.NETCore.App": { "version": "1.0.0-rc2-3002702", "type": "platform" }, "Microsoft.AspNetCore.Server.IISIntegration": "1.0.0-rc2-final", "Microsoft.AspNetCore.Server.Kestrel": "1.0.0-rc2-final", "Microsoft.AspNetCore.Mvc": "1.0.0-rc2-final", "Microsoft.AspNetCore.StaticFiles": "1.0.0-rc2-final", "Microsoft.Extensions.Configuration.FileExtensions": "1.0.0-rc2-final", "Microsoft.Extensions.Configuration.Json": "1.0.0-rc2-final", "Microsoft.Extensions.Configuration.EnvironmentVariables": "1.0.0-rc2-final" }, "tools": { "Microsoft.AspNetCore.Server.IISIntegration.Tools": { "version": "1.0.0-preview1-final", "imports": "portable-net45+win8+dnxcore50" } }, "frameworks": { "netcoreapp1.0": { "imports": [ "dotnet5.6", "dnxcore50", "portable-net45+win8" ] } }, "buildOptions": { "emitEntryPoint": true, "preserveCompilationContext": true }, "runtimeOptions": { "gcServer": true }, "publishOptions": { "include": [ "wwwroot", "web.config" ] }, "scripts": { "postpublish": [ "dotnet publish-iis --publish-folder %publish:OutputPath% --framework %publish:FullTargetFramework%" ] } } |
Save and compile the project.json file and you should see that these packages have been added to your project’s references.
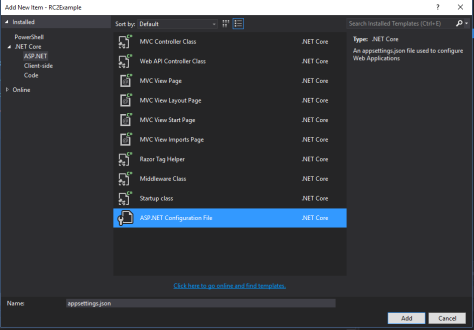
Add the ASP.NET Cofiguration file
Right-click your project > Add New… > Select new ASP.NET Configuration File and name it appsettings.json
Setup Startup.cs
The Startup.cs file will look the same as it did in RC1. The 3 main things we will change for our basic example application are the following:
- Add a Startup() constructor method and link it to appsettings.js
- Add the MVC service to ConfigureServices()
- Configure the MVC the default routes (this replaces the old route config file) and tell the app to use static files in Configure()
After the above changes have been made, your Startup.cs should now look like this:
1 2 3 4 5 6 7 8 9 10 11 12 13 14 15 16 17 18 19 20 21 22 23 24 25 26 27 28 29 30 31 32 33 34 35 36 37 38 39 40 41 42 43 | using Microsoft.AspNetCore.Builder; using Microsoft.AspNetCore.Hosting; using Microsoft.Extensions.DependencyInjection; using Microsoft.Extensions.Configuration; namespace RC2Example { public class Startup { public Startup(IHostingEnvironment env) { var builder = new ConfigurationBuilder() .SetBasePath(env.ContentRootPath) .AddJsonFile("appsettings.json", optional: true, reloadOnChange: true) .AddJsonFile($"appsettings.{env.EnvironmentName}.json", optional: true) .AddEnvironmentVariables(); Configuration = builder.Build(); } public IConfigurationRoot Configuration { get; } // This method gets called by the runtime. Use this method to add services to the container. // For more information on how to configure your application, visit http://go.microsoft.com/fwlink/?LinkID=398940 public void ConfigureServices(IServiceCollection services) { // Add framework services. services.AddMvc(); } // This method gets called by the runtime. Use this method to configure the HTTP request pipeline. public void Configure(IApplicationBuilder app) { app.UseStaticFiles(); app.UseMvc(routes => { routes.MapRoute( name: "default", template: "{controller=Home}/{action=Index}/{id?}"); }); } } } |
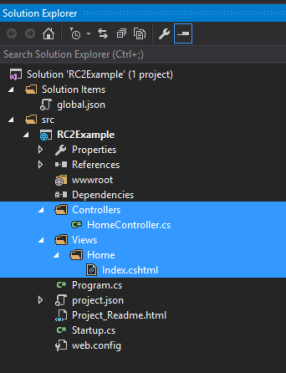
Lastly, add your Controllers and Views
Right-Click your project and add 3 new folders.
- Controllers folder
- Views folder
- Home folder, inside of the Views folder
Next, right-click the Home folder and add a new MVC View Page. Name it “Index.cs” and add some “Hello World” text to it.
After adding these folders and file, your project will now look like this:
Finished!!!!
Check out the final project on GitHub
Build and run your application. Congrats on keeping up with the cutting edge of .Net