Using Web.Config customErrors for ASP.NET

Using Web.Config customErrors for ASP.NET

CheapASPNETHostingReview.com | Best and cheap ASSP.NET Hosting. The ASP.NET framework provides built-in settings to control how to respond when an application error occurs. This functionality is part of the Web.Config customErrors section.

Configuration Options for Web.Config <customErrors>

Like most web.config settings, customErrors can be configured within the Machine.config, root web.config or your application web.config file. Usually, it is set per application.

CustomErrors supports the following modes:

  • On – If defaultRedirect is specified, they will see that content. Otherwise the default error screen with fewer details.
  • Off – Detailed error details will be shown to the user. (the “yellow screen of death screen”)
  • RemoteOnly – Default value. Detailed errors only are shown to local users. Remote users receive custom error screens or fewer details.

Example configuration:

How to View Full ASP.NET Error Details, Disabling Custom Errors

If your application is throwing errors, but you cannot see the full error message, you can disable customErrors.

web-config-customerrors-10799

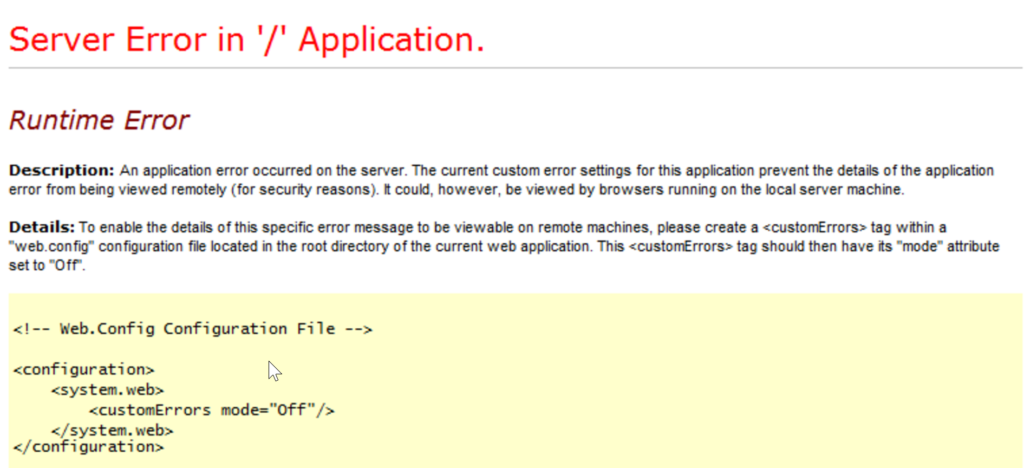
To do this, you will want to set customErrors mode to “Off” as shown below. Be careful though as this could expose sensitive information shown in error messages as well as detailed stack traces.

Other Ways to View ASP.NET Exceptions

There are other ways to track, find, and view application errors besides the ASP.NET yellow screen of death. Ideally, your application should be logging all of your errors to a log file and error monitoring service. You can also check Windows Event Viewer, and you may be able to see your exceptions. Although, be warned that exceptions are rate limited to Event Viewer and it does not record all of them.

How to Log All Application Errors

Depending on your type of application, there are potentially multiple ways to do this. If your application has a Global.asax file, you can subscribe to unhandled exceptions as shown below:

How to View All Application Exceptions With Retrace

Retrace provides code-level performance monitoring for your application. Part of that includes collecting all application exceptions. Retrace can collect unhandled exceptions, exceptions explicitly logged to it, or every single exception ever is thrown (first chance exceptions).

To make the most of your application errors, you should use an error monitoring service, like Retrace. Benefits of an error monitoring service:

  1. Real-time alerts – know immediately when a new error happens
  2. Centralized repository – one place your team can access everything
  3. Error rates – quickly identify large spikes in error rates
  4. Improve productivity – find root cause of problems much faster

How to Running Sitefinity from a Docker Container

How to Running Sitefinity from a Docker Container

CheapASPNETHostingReview.com | Best and cheap Sitefinity Hosting. Since Microsoft announced support for containers in the next version of Windows Server (Windows Server 2016) I’ve been eager to find out if we can run Sitefinity from a container on that OS. The short answer is yes, we can containerize Sitefinity applications and run them on container hosts. This blog post will cover a proof of concept that shows Sitefinity can be containerized and is is influenced by this guide on running Docker containers:

dc SitefinityLogo_woTagline_RGB-1024x433

Prerequisites

  • Sitefinity project connected to a database. For this setup, I have chosen SQL Azure database
  • Windows Container Host running Windows Server 2016 Core. For the purposes of this demo I will be using a VM created on Azure with the Windows Server 2016 Core with Containers Tech Preview 4 image

Let’s roll up our sleeves

If you will be using a container host on Azure, create it and you are ready to go. If you have decided to explore this locally.  The Azure container host image comes with Docker pre-installed so you will have some base images to start from. In the command line run the following command:

Creating Docker container image

For the sake of simplicity we will create the image by running a new container and then committing the changes applied to it in a new image. To create a new Docker container and instantiate a new Powershell session, run the following command:

Once the container is instantiated and our Powershell session has started we need to configure the container to host our Sitefinity website. To achieve this we will use Powershell DSC to install all necessary Windows features and configure our website in IIS. I have prepared a sample DSC configuration and configuration data in this GitHub repo: sf-cntnr-poc. The dsc/sfwebapp.ps1 file contains the necessary configuration and dsc/sfwebapp-data.psd1 contains the variables (Windows feature, URL from which to download the website, etc.). Since I am working in Azure and I do not have access to my local computer, I have zipped my website and uploaded it to Azure Blob. This will serve as the source of my website. If you are using the same approach edit the dsc/sfwebapp-data.psd1 file to point it to the proper URL:

Once you make the necessary changes to those files to reflect your setup you can upload them to Azure blob as well so that they can be downloaded on the Docker container. The DSC configuration uses some community modules to set up our website, so before we apply the configuration we need to download those modules. In the Powershell session of your Docker container run the following commands to install the modules:

Once this is done let’s get the DSC configuration and data files from our blob:

At this point we are ready to configure our container with everything necessary to host a Sitefinity website. First let’s prepare the DSC configuration

And finally run the DSC configuration:

Now get a cup of coffee and wait for the configuration changes to be applied. After the configuration is applied the container will be ready to run a Sitefinity site, however, we need to take care of some firewall settings so that requests can reach the IIS in the container. So let’s exit the container and capture our image:

Opening ports on the firewall

When the commit command is ready you will be able to see your new Docker image in the images list. What is left now is to open the necessary firewall ports, expose port 80 from the Azure management portal, and run our new container. First, to make sure that the Windows firewall is allowing port 80, run the following Powershell command:

Running your containerized site

After you create the necessary endpoint in the Azure management portal all you are left to do is to run the container using the following command:

When the container is ready, the site will be accessed by the outside world using the domain name assigned to the Azure VM, e.g. http://sfcntnr1.cloudapp.net/.

Use An Area In ASP.NET Core

CheapASPNETHostingReview.com | Best and cheap ASP.NET Core hosting.  In order to include an Area in an ASP.NET Core app, first we need to include a conventional route in the Startup.cs file (It’s best to place it before any non-area route).

In Startup.cs, configure the method.

Then, make a folder named Areas in the app root and make another directory named Admin inside the former. Inside the admin folder, create the following folders (ViewComponent is optional).

Now, we will create a Controller inside the Controllers folder named AdminController.

Now, in order for that to work, you’ll need to create Views for all actions that return one. The hierarchy for Views is just like what you have in a non-area Views folder.

Question – What if I want to have another Controller inside my Area?

Answer 

Just add another Controller beside AdminController and make sure the routes are like the following,

The important part is [Route(“admin/[controller]”)]. With that, you can keep the style of routing to admin /controller/ action/.

Main Advantages of ASP.NET Framework

Main Advantages of ASP.NET Framework

CheapASPNETHostingReview.com | Best and cheap ASP.NET Hosting. With the tough competition going on and the tendency to produce something innovative for the customers, the  web development companies are now focusing on using cutting-edge technologies to develop custom applications. To develop any application, the first thing you need to understand is the nature of your business in order to deploy the application which is suitable for your business. And the second most thing is the selection of the best technology platform for the development process.

03_blog

With the continuous change and demand in the technology market, Microsoft created Asp.Net Framework to create feature rich websites and web applications. Active server pages or Asp, is the perfect platform for creating high-end applications. Dot Net is the best server side scripting technology where Windows web server is used to host Asp.Net websites and web applications.

Introducing Asp by Microsoft corporation is one of the biggest achievement as to meet the market demand of dynamic web pages which can be viewed on different web browsers. With dot net you can create reliable and reusable applications. The Asp.Net framework is a highly popular one and relatively easy for the .Net developers to create compelling Asp.net applications by using Visual Studio. Well the good part is, it is not only limited to Asp but also give the advantage to the developers to make use of other programming languages like C#, VB etc.

Let’s take a look at some key advantages of using Asp.Net Framework

  • Keep you Asp.net applications secured with the built-in Windows authentication and per-application configuration.
  • Asp.Net has reduced the long lines of code required to develop large applications.
  • Asp.Net and Html, together generate dynamic web pages smoothly.
  • Being an ideal server-side scripting technology, Asp.Net code first runs on Windows server before displaying on the web browser.
  • Asp.Net framework is language independent, means you can choose any programming language which best suited to you application.
  • With the built-in configuration information, Asp.Net is easy to deploy.
  • The windows web server thoroughly monitors the web pages, multiple components, and applications running over it.
  • The Dot Net Framework quickly gives an alert for memory leaks, unbounded loops, and other wrong behaviors, immediately killing them and restart them over again.
  • Asp.Net features like early binding, JIT compilation, caching services and native optimization supports gives your application the high level of performance.
  • All the Asp.Net applications are highly monitored and managed to help application available to handle requests.
  • The best part of Dot Net Framework is it has its own built-in caching features.
  • The content and the program logic are separated in the .Net Framework, thus reducing the program inconveniences.

Microsoft Asp.Net Framework is a widely used development framework for building enterprise level web applications, that today’s developers love to use. The Dot Net technology offers immeasurable benefits for various issues like memory management, security, and exceptional handling, a developer may face. The above-mentioned advantages made Asp.Net Framework an ideal choice for developing .Net Application Development. So what are you still waiting for? Let’s get started with this next-generation platform! And if we missed out any of the other advantages of .net, then do let us know in the comment below.

Everything about Html.Action And Html.RenderAction In ASP.NET MVC

Everything about Html.Action And Html.RenderAction In ASP.NET MVC

CheapASPNETHostingReview.com | Best and cheap ASP.NET MVC 6 hosting. This article introduces both @Html.Action and @Html.RenderAction. These are used to call a partial view in another view by action method. As we have other options such as @Html.Partial and @Html.RenderPartial to call a partial view in other views then why do we use @Html.Action and @Html.RenderAction ? We use these two html helper methods in the following scenarios.

  1. To call partial view in another view.
  2. Partial view is independent to corresponding view in other words partial view model in not related to corresponding view model in strongly typed views.
  3. We need some operations over data of partial view before it render in corresponding view.
  4. We call a partial view from ChildActionOnly action methods in another view by GET request.

Whenever we got above situation in our application then we prefer to use these Html helper methods. Now let’s have a look on summery information of these Html helper methods.

@Html.Action

This Html.Action renders partial view as an HTML string so we can store it in another string variable. It is string return type method so first it returns result as a string then renders result to response.

@Html.RenderAction

This is also same as Html.Action but main difference is that it renders result directly to response that’s why it is more efficient if the action returns a large amount of HTML over @Html.Action.

Now we will have a look on particle implementation of these two.

Using Code

We create an MVC application which has a view for employee login and employee registration as both employee login and employee registration are independent to each other. To combine these on single view, we create two partial views, one for Employee login and another for employee registration. As these two views are also independent to corresponding views in which these call.

web2

First of all we create two view models one for Employee Login (EmployeeLoginViewModel) and another for Employee Registration (EmployeeViewModel). The following code snippet shows both.

As per figure 1, we create an Index view which has both employee login and employee registration partial view so we define a controller that has three action methods. The “Index” action method returns main view and other two child action methods “EmployeeLogin” and “EmployeeRegistration”. The following code snippet shows EmployeeController.

In our example, the Index view is nota strongly typed view. If it is strongly typed then it doesn’t have any impact on partial view model because with help of @Html.Action and @Html.RenderAction, we can use independent models in partial views. Now have a look that how partial views are called in corresponding view. The following code snippet for Employee Login partial view.

Get ASPHostPortal 15% discount with this promotional link

The following code snippet for Employee registration view.

Now we call both partial views with help of @Html.Action and @Html.RenderAction in main index view. The following code snippet is for the same.

Now run the application and we get the same  result as figure 2.

wwwwww

How To Select Insert, Update And Delete With ASP.NET MVC

How To Select Insert, Update And Delete With ASP.NET MVC

CheapASPNETHostingReview.com | Best and cheap ASP.NET MVC hosting. In all the above articles I have explained about ASP.Net MVC. Now I think you are clear about ASP.Net MVC and creating simple ASP.Net MVC applications. Whenever we are developing the applications we are related to a database and in the database driven applications we need to perform CRUD operations. On various blogs and sites you will find CRUD operation samples about ASP.Net MVC. But on many the sites I have seen they are all using Entity Framework to perform the CRUD. Since it is the standard, we have to follow it while developing ASP.Net MVC applications instead of using DataSet, Command, Connection, DataAdapter and DataReader. But in many cases we have to use these ADO.Net 2.0 operations. In this  article we will perform all the operations using ADO.NET instead of the ADO.NET Entity Framework. But use these ADO.Net only where you need to else use the ADO.Net Entity Framework only. So let’s start performing CRUD using ADO.Net.

Step 1 : Create the table in your database with the following script.

Step 2 : Now create a new ASP.Net MVC3 Web application with an empty template. This will create one predefined structure with Controllers, Modes and Views folders. All these folders are empty; now we have to add the content to these folders.

Step 3 : As you know, first we have to create a controller so let’s add a new controller with the name Home in the controllers folder. Now our empty controller is ready with an Index method. On the index method we will call the dataset from the database to display the existing Authors in our table. For this we will create a model which will return the dataset, then we will display this data on the view through the Index method of the Home controller. So let’s create one model i.e. class in Models folder with the name SelectModel and write the following code in it to retrieve the data from the database.

In the selectModel class we have one method called GetAllAuthors which returns the dataset of all authors. Now modify your Index method of Home Controller like Entity Framework.

In the above line of code we called the GetAllAuthors method from SelectModel which will return the dataset object and simply we put this dataset in the viewbag. As you know in C# 4.0 we have dynamic programming; you can see one excellent example with viewbag. Here we have written ViewBag.AuthorList which will create dynamically on Author list on runtime for us. Still now we are finished up to calling the dataset and transferring it to the view but still we don’t have any
view so right-click in the Index method and add a new empty view to display our authorlist and write the following markup to display the results.

In the above markup we are displaying our authorlist by creating a HTML table with having Edit and Delete links and lastly having one more ActionLink to add a new author record.

Step 4 : At this stage we are ready with our Index or select operation; now we can add more methods to our Home Controller to perform Edit, Update and Delete operation so let’s start with adding a new record i.e. inserting a new record in the database. In the last step we added an Add New Author ActionLink with Add method so we need to add two more methods in our Home Controller, one for displaying the fields and another for inserting the values; but before that we need to create our model. So add one Model class called InsertModel in your models folder and write the code like below.

The Above code contains some properties with attributes that are used for validation on our view as well as the InsertModel contains Insert method for inserting values in database. Now our InsertModel is ready, so you can add two methods for adding the record in the database add one ADD method with [HttpGet] and a second ADD method with [HttpPost] attributes. These attributes are all of you known. So create two add methods like below.

In the above code, first one add method simply returns the view to take some input from the user and the second add method gets the values from the view and validates it and inserts these values into the database by calling the Insert method of InserModel.

Step 5 : Still now we have only finished Select and Insert operations; now we will see Edit and update. In step3 we have added one edit link bind with AuthorId. On the basis of this AuthorId we will Edit the record and update the record in the database. As in previous steps we need one more Model class so add a Model class called UpdateModel and write the code like below.

In the above code we have properties and one Update method to update the record in the database. In all ModelClasses you can see I’m using ADO.Net only.
Now we have our model class ready so we can add some methods to perform Edit and update operations in our Home Controller so add two more methods called Edit for editing and updating the records like below.

In the above code you can see first the edit method performs some logic to call the specified id record from the database and display this record on the view and the second Edit method performs the update operations.

Step 6 : Now our last operation still remains, i.e. delete; so to delete, add one more model called DeleteModel and write the following code which contains only a delete method to delete the record of the specified AuthorId from the database

In Step3 we have added one ActionLink with delete and given the authorid to it for deleting the specified authorid record from the database. So now we can add one Delete Method in our Home Controller, so add it and write the following code to call the delete method of the DeleteModel to delete the record.

Now we have completed all our operations. Now you can run the application and can perform all the Select, Insert, Update and Delete operations.

Conclusion: In this article we have seen how to add, edit, update and delete the records using ADO.NET in ASP.Net MVC. I hope you enjoyed this article.

Securing Access to Files using the ASP.NET IHttpHandler

Securing Access to Files using the ASP.NET IHttpHandler

CheapASPNETHostingReview.com | Best and cheap ASP.NET hosting. The IHttpHandler interface is an underused interface in my humble opinion. It gives the developer the ability to process HTTP requests with custom HTTP handlers. Have you ever wondered why aspx pages are processed by ASP.NET?

To answer that question, you need to open the Application Configuration dialog in IIS. This example uses IIS 6. The Application Configuration is located on the Home Directory tab in IIS. Clicking the configuration button opens the Application Configuration dialog shown below. Highlighted is the .aspx Application Extension. The executable path for this extension is c:\windows\microsoft.net\framework\v2.0.50727\aspnet_isapi.dll.

When IIS receives a request and the extension is .aspx, it directs the request to the aspnet_isapi.dll. The aspnet_isapi.dll will check the web.config file located in C:\Windows\Microsoft.NET\Framework\v2.0.50727\CONFIG to see what class will handle the request. The following code is a small extract of the web.config file:

In the code above, the httpHanders section has an entry for *.aspx. All *.aspx requests will be processed by the System.Web.UI.PagehandlerFactory class.
You as the developer have the ability to process HTTP requests with customer HTTP handlers. In the following article I’ll take you through a typical business scenario where custom HTTP handlers are great. Here are the business rules we must follow:

  • ceo files can only be viewed by the CEO
  • The CEO must be logged into the website

Open Visual Studio 2008 and choose File > New > Web > ASP.NET Web Application. C# users can name the application as ‘HttpHandler’. VB.NET users can call it ‘HttpHandlerVB’

  • Right click the project and choose Add > New Folder. Rename the folder to SecuredFiles. This is where the CEO files will be. Add a new text file to this folder and rename the extension to *.ceo.
  • Right click the project and choose Add > New Item > Generic Handler.

Open the CustomHandler.ashx file and add the following code:
C#

The CustomHandler class implements the IHttpHandler interface. Implementing this interface allows you to create custom HTTP handlers. The two methods that we must implement are ProcessRequest and IsReusable. ProcessRequest accepts the HttpContext as a parameter, which contains all the information about the HTTP request. We want this HTTP handler to check HttpContext to ensure the HTTP request is from an authenticated user and they’re username is CEO.
Next you must update the web.config file and add a new entry to the httpHandlers section. The following xml is required:

This tells our website that if there are any HTTP requests for pages that have a *.ceo extension, they will be processed by the WebApplication1.CustomHandler class.
To complete this demo you’ll need to update the web.config file to use Forms authentication. The following xml is required:

Right click on the project and choose Add > New Item > Web Form. Add a Login control to the page and add the following code to the Authenticate event:
C#

The authentication would normally be verified against a database, but for this example we’ll let everyone through. Type in any username and password of your choice. Once the user has logged in they’ll be redirected to the Default.aspx page. There is a link to the CEO file. Clicking on that link will direct the HTTP request to the CustomerHandler class. If the user has logged in as CEO (username: Ceo) they will be able to download the file. If not, they will see a message on the screen that says No access unless you’re the CEO!!!.
HTTP handlers are a great way to write generic functions to handle HTTP requests. You can utilize HTTP handlers to process both GET and POST requests. I’ve found them useful for the scenario above and I’m positive you can take this example and come up with other ways to utilize this powerful tool.

AD Authentication ASP.NET Core 2.0

AD Authentication ASP.NET Core 2.0

CheapASPNETHostingReview.com | ASP.NET Core and Azure AD have been kind of my passion for the last year. Naturally with ASP.NET Core 2.0 coming out I wanted to see what had changed in the area of authentication. I made an article on enabling Azure AD authentication in ASP.NET Core 1.0 almost a year ago.

ASP.NET Core 2.0 authentication changes

Many things have changed in 2.0. Authentication is one of them. I will go through changes to other parts in future articles.

In ASP.NET Core 1.X, authentication middleware were registered in the Configure method in the Startup class. That has had a major change. There is now only a single middleware that you add:

Other middleware, like cookie authentication middleware need not be added.

Instead, authentication is now done through services. You will add them in ConfigureServices. Here for example we add cookie authentication.

Another thing that has changed is that we can now define the default authentication/challenge/sign-in handler in one place. You can see an example of the new approach in the next section.

Setting up Azure AD authentication in Startup

In an MVC application that wants to use Azure AD authentication, we need two authentication handlers:

  1. Cookies
  2. Open Id Connect

We can add them to the service collection like this:

Cookies is responsible for two things:

  1. Signing the user in (creating the authentication cookie and returning it to the browser)
  2. Authenticating cookies in requests and creating user principals from them

Open Id Connect is responsible for only one thing really: Responding to challenges from [Authorize] or ChallengeResult returned from controllers.

When it receives a challenge, it sends the user to authenticate against the identity provider (in this case Azure AD). When the user gets redirected back to the app, it does a multitude of things to authenticate the returned info, and then requests the default sign-in handler to sign the user in.

So let’s configure the default handlers:

Note there that by default, cookie authentication handles authentication and sign-in. Open Id Connect only handles challenges. In 1.X, these would have been defined in the middleware options (except for the default sign-in middleware).

Then we need to add the authentication middleware to Configure as mentioned before:

For basic scenarios, we are actually almost done. Just one thing missing, the configuration!

Configuring Open Id Connect automatically/slightly manually

Previously we added Open Id Connect authentication like this:

If you check it’s documentation, it says:

Adds OpenIdConnect authentication with options bound against the “OpenIdConnect” section from the IConfiguration in the service container.

So, it expects you have a section like this e.g. in appsettings.json:

And in user secrets:

These will automatically map to properties in OpenIdConnectOptions.

So, configuration? Done.

Now, in some cases you want to e.g. define handlers that do something when you receive the authorization code.

There’s just one small thing. When you specify handlers like this:

Configuration is not bound in this case. You can do that however just by adding one line of code:

If you just need the authentication and no access tokens to APIs etc., the first option with no arguments that auto-binds to the configuration is best.

Otherwise, at least bind options from configuration so you don’t have to type configuration keys manually.

Here is a more complete example of configuring Open Id Connect:

We first bind the configuration section “Authentication” to the Open Id Connect options. Then we setup an event handler for when we get an authorization code from Azure AD. We then exchange it for an access token for Microsoft Graph API.

The token cache class that I made here uses the distributed cache to store tokens. In development that would be a memory-backed cache, but in production it could be backed by a Redis cache or an SQL database.

Now while the handler can acquire an access token, I prefer using ADAL/MSAL as tokens then get cached, and it handles token refresh automatically.

We also setup an exception filter for MVC so that if ADAL token acquisition fails (because the token was not found in cache), we redirect the user to Azure AD to get new tokens. The reason why we use the absolute newest bits (at the time of writing) in the sample app on GitHub, is because Automatic ChallengeBehavior is finally gone in these versions 🙂 Now when you return a ChallengeResult, you get the challenge behaviour every time. If you want to return a 403, you return a ForbidResult.

Best SEO Friendly URL’s for ASP.NET Core 2.0

Best SEO Friendly URL’s for ASP.NET Core 2.0

CheapASPNETHostingReview.com | Best and cheap ASP.NET core 2.0 hosting. For some reason there are not a lot of Search Engine Optimization (SEO) blog posts or projects out there. Taking a few simple steps can make your site rank higher in Google or Bing search results so it’s well worth doing.

What is an SEO Friendly URL?

Essentially you want a simple short URL that tells the user what they are clicking on at a glance. It should also contain keywords pertaining to what is on the page for better Search Engine Optimization (SEO). In short, a page will appear higher up in search results if the term a user searches for appears in the URL. Your URL should look like this:

SEO-Friendly-URL

The URL contains an ID for a product and ends with a friendly title. The title contains alphanumeric characters with dashes instead of spaces. Note that the ID of the product is still included in the URL, to avoid having to deal with two friendly titles with the same name.

If you elect to omit the ID, then you have to do a lot of footwork to make things work. Firstly, you have to use the title as a kind of primary key to get the product data from your database and secondly, you also have to figure out what to do when there are two pages with the same title. Each time you want to create a new title, you have to scan your data store to see if the title already exists and if it does either error and force the creation of a different title or add make it unique by adding a number on the end. This is a lot of work but does produce a nicer URL, the choice is yours.

How to Build One

Take a look at the controller action below. It is a very simple example of how to use SEO friendly URL’s. In our example we have a product class which has a ID and title properties, where the title is just the name of the product.

All the work is done by the FriendlyUrlHelper which turns the product title which may contain spaces, numbers or other special characters (which would not be allowed in a URL without escaping them) into a lower-kebab-case title.

This generated friendly title is compared with the one that is passed in and if it is different (Someone may have omitted the friendly title or mis-spelled it) we perform a permanent redirect to the product with the same ID but now with the friendly title. This is important for SEO purposes, we want search engines to only find one URL for each product. Finally, if the friendly title matches the one passed in we return the product view.

The FriendlyUrlHelper

The FriendlyUrlHelper was inspired by a famous StackOverflow question ‘How does Stack Overflow generate its SEO-friendly URLs?‘. The full source code for it is shown below.

The difference between my version and the one in the StackOverflow answer is that mine optionally handles non-ASCII characters using the boolean remapToAscii parameter. This parameter remaps special UTF8 characters like ‘è’ to their ASCII equivalent ‘e’. If there is no equivelant, then those characters are dropped. All modern browsers except Internet Explorer and Edge display the ‘è’ correctly. Older browsers like Internet Explorer percent encode these international characters so they are displayed as’%C3%A8′. What you set this to depends on whether your target users are English speakers and if you care about supporting IE and Edge. I must say that I was hoping Edge would have added support so that remapToAscii could be turned off by default but I’m sorely dissapointed.

Using the third parameter you can specify a maximum length for the title with any additional characters being dropped. Finally, the last thing to say about this method is that it has been tuned for speed.

Where Can I Get It?

This is a great little snippet of code to make your URL’s a human readable, while giving your site an SEO boost. It doesn’t take much effort to use either. This helper class is available in the Boilerplate.AspNetCore NuGet package or you can look at the source code in the ASP.NET MVC Boilerplate Framework GitHub page.

Deploy ASP.NET Core to IIS & How ASP.NET Core Hosting Works

Deploy ASP.NET Core to IIS & How ASP.NET Core Hosting Works

CheapASPNETHostingReview.com | Best and cheap ASP.NET Core 1.0 hosting. In this article, we will review how to deploy an ASP.NET Core application to IIS. Deploying an ASP.NET Core app to IIS isn’t complicated, but ASP.NET Core hosting is a little different than ASP.NET.

How to Configure Your ASP.NET Core App For IIS

The first thing you will notice when creating a new ASP.NET Core project is they are actually console applications. Your project now contains a Program.cs file just like a console app would have and it contains the following code:

What is the WebHostBuilder?

All ASP.NET Core applications require a WebHost object that essentially serves as the application and web server. WebHostBuilder is used to configure and create the WebHost. You will normally see UseKestrel() and UseIISIntegration() in the WebHostBuilder setup code.

What do these do?

  • UseKestrel() – This registers the IServer interface for Kestrel as the server that will be used to host your application. In the future, there could be other options, including WebListener which will be Windows only.
  • UseIISIntegration() – This tells ASP.NET that IIS will be working as a reverse proxy in front of Kestrel. This then specifies some settings around which port Kestrel should listen on, forwarding headers, and other details.

If you are planning to deploy your application to IIS, UseIISIntegration() is required

What is AspNetCoreModule?

You may have noticed that ASP.NET Core projects create a web.config file. This is only used when deploying your application to IIS. It registers the AspNetCoreModule as an HTTP handler.

Default web.config for ASP.NET Core:

If you are planning to deploy your application to IIS, UseIISIntegration() is required

Default web.config for ASP.NET Core:

AspNetCoreModule handles all incoming traffic to IIS and acts as the reverse proxy that knows how to hand the traffic off to your ASP.NET Core application. You can view the source code of it on GitHub. It also ensures that your web application is running. It is responsible for starting your process up.

Install .NET Core Windows Server Hosting Bundle

Before you deploy your application, you need to install the .NET Core hosting bundle for IIS. This will install the .NET Core runtime, libraries, and the ASP.NET Core module for IIS.

After installing it, you may need to do a “net stop was /y” and “net start w3svc” to ensure all the changes are picked up for IIS.

Steps to Deploy ASP.NET Core to IIS

Before you deploy, you need to make sure that WebHostBuilder is configured properly to use Kestrel and IIS. Your web.config should also exist and look similar to our example above.

Step 1: Publish to a File Folder

how-to-deploy-asp-net-core-to-iis-10614

Step 2: Copy Files to Preferred IIS Location

Now you need to copy your publish output to where you want the files to live. If you are deploying to a remote server, you may want to zip up the files and move to the server. If you are deploying to a local dev box, you can copy them locally.

For my example, I am copying the files to C:\inetpub\wwwroot\AspNetCore46

You will notice that with ASP.NET core there is no bin folder and it potentially copies over a ton of different .NET dlls. Your application may also be an EXE file if you are targeting the full .NET Framework. My little sample project had over 100 dlls in the output.

img_58ee6a96d49de-1024x631

Step 3: Create Application in IIS

First, create a new IIS Application Pool. You will want to create one under the .NET CLR version of “No Managed Code“. Since IIS only works as a reverse proxy, it isn’t actually executing any .NET code.

Second, create your new application under your existing IIS Site, or create a new IIS site. Either way, you will want to pick your new IIS Application Pool and point it at the folder you copied your ASP.NET publish output files to.

img_58ee6b7a8b7e4

Step 4: Load Your App!

At this point, your application should load just fine. If it does not, check the output logging from it. Within your web.config file you define how IIS starts up your ASP.NET Core process. Enable output logging by setting stdoutLogEnabled=true and you may also want to change the log output location as configured in stdoutLogFile. Check out the example web.config before to see where they are set.

Advantages of Using IIS with ASP.NET Core Hosting

Microsoft recommends using IIS with any public facing site for ASP.NET core hosting. IIS provides additional levels of configurability, management, security, logging, and many other things. Check out my blog post about Kestrel vs IIS to see a whole matrix of feature differences. It goes more in depth about what Kestrel is and why you need both Kestrel & IIS.

One of the big advantages to using IIS is the process management. IIS will automatically start your app and potentially restart it if a crash were to occur. If you were running your ASP.NET Core app as a Windows Service or console app, you would not have that safety net there to start and monitor the process for you.